
One of the benefits of full site editing [FSE] in WordPress is that you can customize every layout on your site – navigation, pages, blog posts, and more. It also makes it easier to modify WooCommerce templates, so you can structure product pages to showcase your merchandise in the best possible light. If your product pages are content-heavy, showing a persistent “add to cart” area can be useful so that customers can purchase once they’ve read enough to buy. Adding a WooCommerce sticky add to cart area can help keep the “add to cart” action visible for users – in fact, this is exactly why we’ve done this on our product pages! (See Discontinued Products for WooCommerce as an example.)
I’ll show you how we created this sticky add to cart header on our site using FSE. You must be using a full site editing theme to follow this guide, such as Twenty Twenty-Four. Here’s a video guide to creating a WooCommerce sticky add to cart, or you can read on for a step-by-step guide.
Add the WooCommerce sticky add to cart section
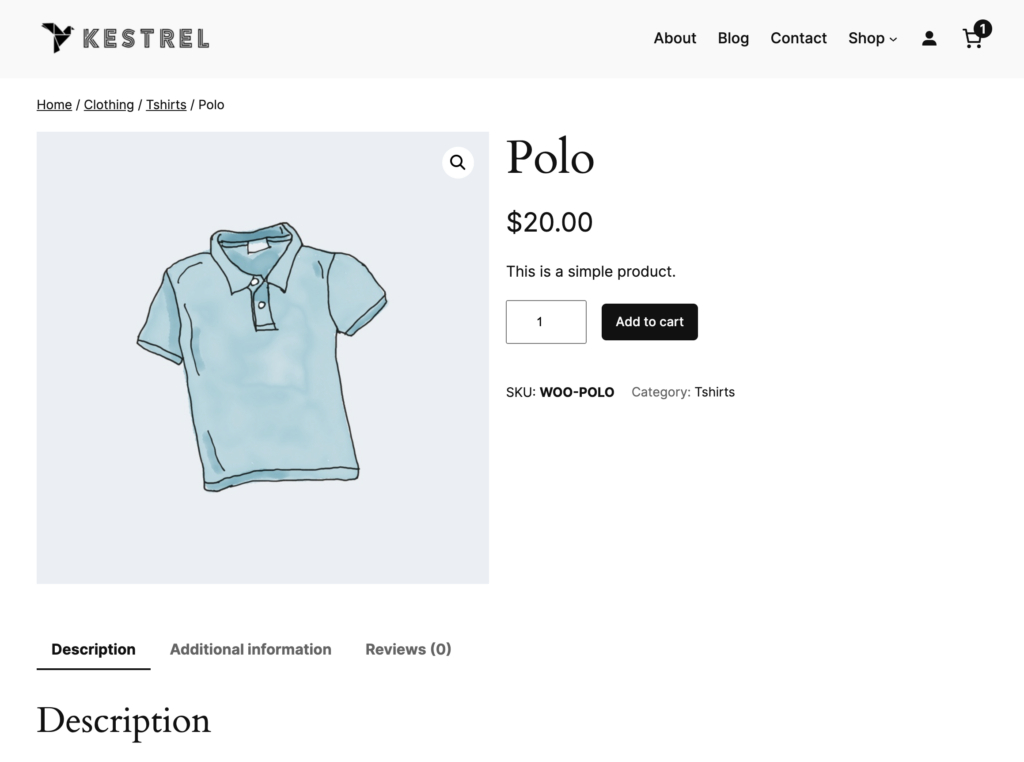
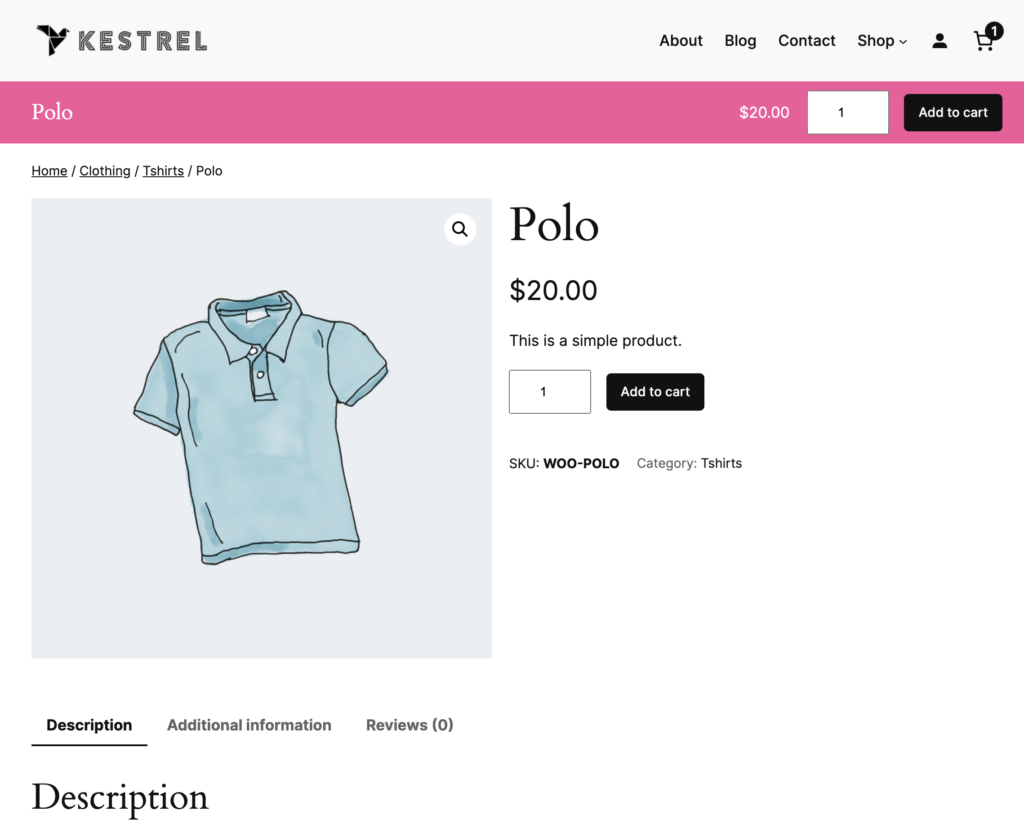
The typical WooCommerce product page looks something like this: image left, short description / add to cart right, and then full description and details below. I’ll modify it to add a header bar with a persistent add-to-cart that will stick to the top of the page as we scroll past it:
First, you’ll need to visit a product page on your site, then click “Edit site” in your admin bar. This will take you to the full site editor for your single product templates. Once we’re editing that template, we’ll add a new group block between the “header” and existing “group” block (which has all of the product content).
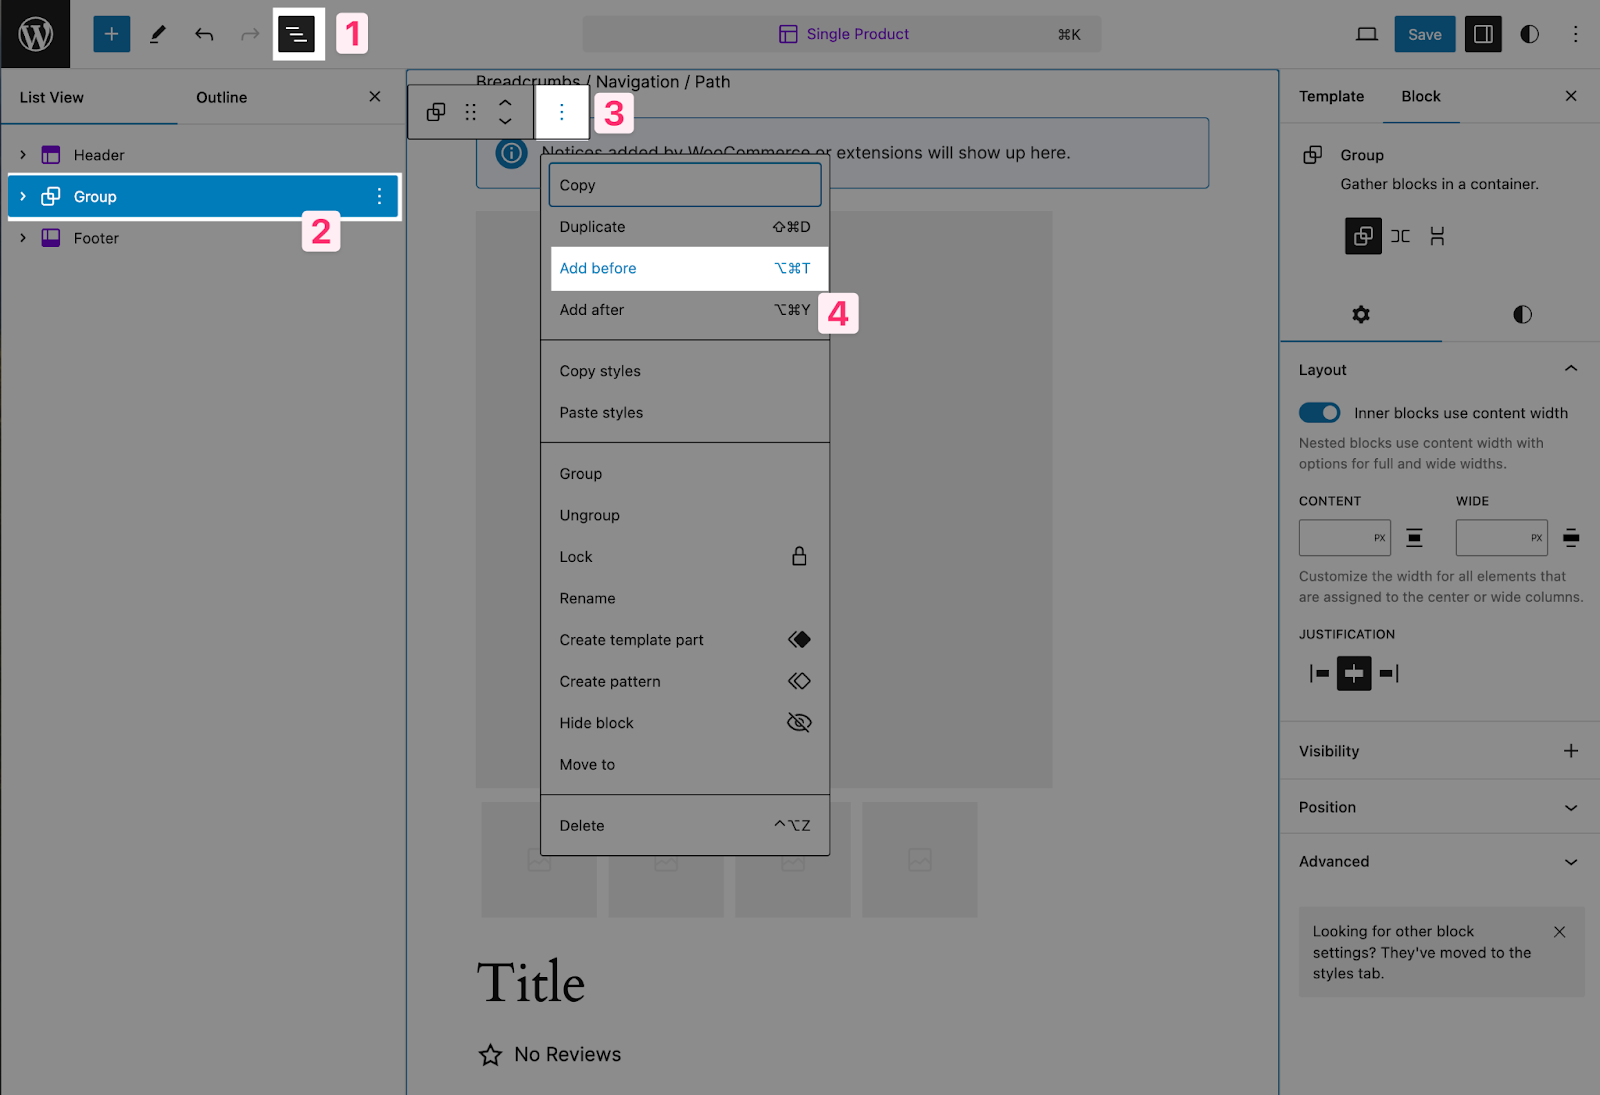
This will be the “container” for our sticky add to cart header. Depending on the style of your theme, you may want to style this container to make your section stand out.
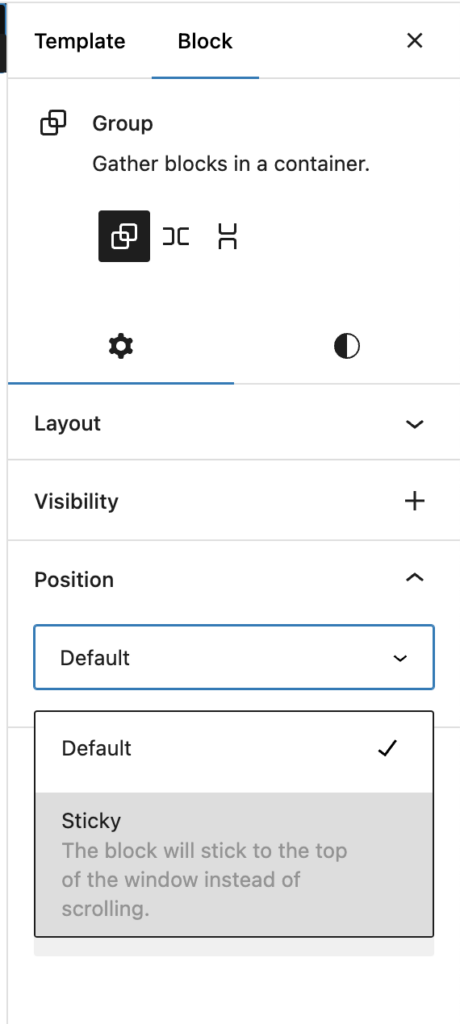
I’ll add a pink background to my group, and change its position to become sticky on the page – this means it will “stick” to the top of the page once users scroll past it, and remain there as they scroll through the rest of the page.
If a user scrolls back up past the original position, then this block will move back to its original position.
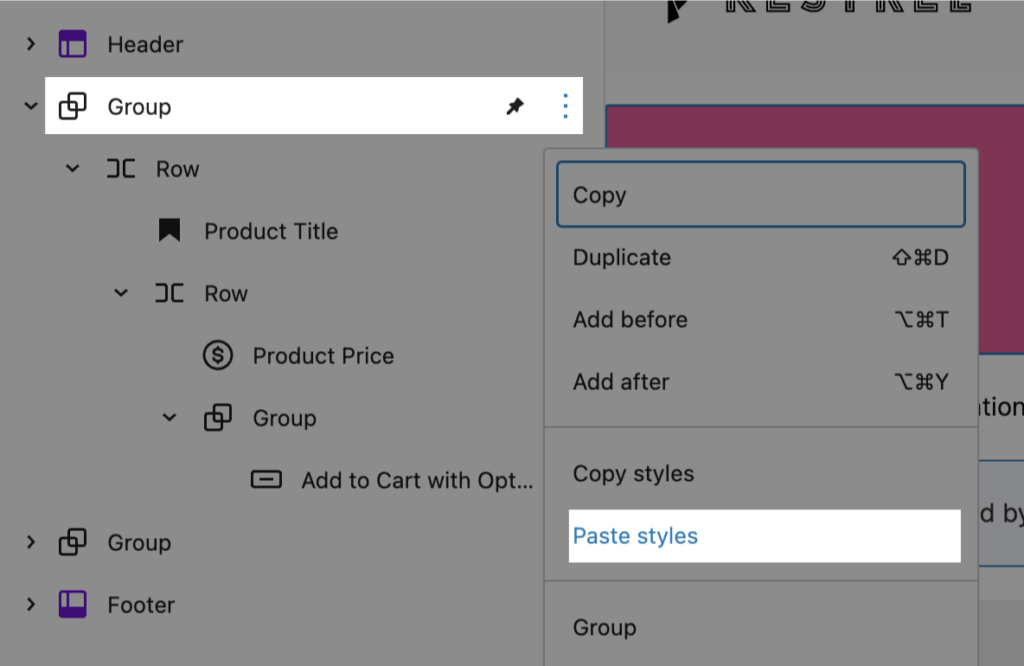
Inside of this group, we’ll now create our WooCommerce sticky add to cart header components. Here’s the structure we want to use for the blocks – but there’s an easy way for you now to embed this on your site! If you copy the block code below, then click the “more” icon on the group you just created, you can choose to “paste styles”. This will add the block code you’ve just copied to this group.
Of course, you can also choose to emulate the group I’ve created by following my outline below the block code:
<!-- wp:group {"style":{"color":{"background":"#f7559a"},"elements":{"link":{"color":{"text":"var:preset|color|base-2"}}},"position":{"type":"sticky","top":"0px"}},"textColor":"#fff","layout":{"type":"constrained"}} -->
<div class="wp-block-group has-base-2-color has-text-color has-background has-link-color" style="background-color:#f7559a"><!-- wp:group {"align":"wide","layout":{"type":"flex","flexWrap":"nowrap","justifyContent":"space-between"}} -->
<div class="wp-block-group alignwide"><!-- wp:post-title {"level":4,"style":{"elements":{"link":{"color":{"text":"var:preset|color|base-2"}}}},"textColor":"base-2","__woocommerceNamespace":"woocommerce/product-collection/product-title"} /-->

<!-- wp:group {"layout":{"type":"flex","flexWrap":"nowrap","justifyContent":"right"}} -->
<div class="wp-block-group"><!-- wp:woocommerce/product-price {"isDescendentOfSingleProductTemplate":true} /-->

<!-- wp:group {"style":{"spacing":{"margin":{"top":"10px"}}},"layout":{"type":"constrained"}} -->
<div class="wp-block-group" style="margin-top:10px"><!-- wp:woocommerce/add-to-cart-form /--></div>
<!-- /wp:group --></div>
<!-- /wp:group --></div>
<!-- /wp:group --></div>
<!-- /wp:group -->
Here are the modifications I’ve made for each block:
- Group: Container block. I changed the background and text color for this block. This block should also have its position changed to “sticky”.
- Row: Container for the “content” of the header. I made this wide-width, and changed its justification to use “space between items”.
- Product title: I added this in the leftmost position of the row, and changed it to an h4 instead of an h2.
- Row: This is the container for the add to cart area. I changed its justification to be right-aligned.
- Product price: I added this to the row with no modifications.
- Group: I added a “group” to contain the add-to-cart form. This is required because I want to add a small margin to the form, but the add-to-cart block has no styling options. I used a group to “wrap” it, and added a 10px top margin to the group (Woo’s default styles will add a 10px bottom margin, so I’m just matching it).
- Add to cart: I added the “add to cart” block inside this group.
- Row: Container for the “content” of the header. I made this wide-width, and changed its justification to use “space between items”.
Whew, I know it seems like a lot! Copying and pasting the block code is certainly easier – you may have to change your colors, but it will give you the right structure.
Style the new sticky section
If you save your product template now, you’ll see we’re almost there! We have a sticky header on product pages, with a working add-to-cart form. It just needs a little refinement to strut its stuff.
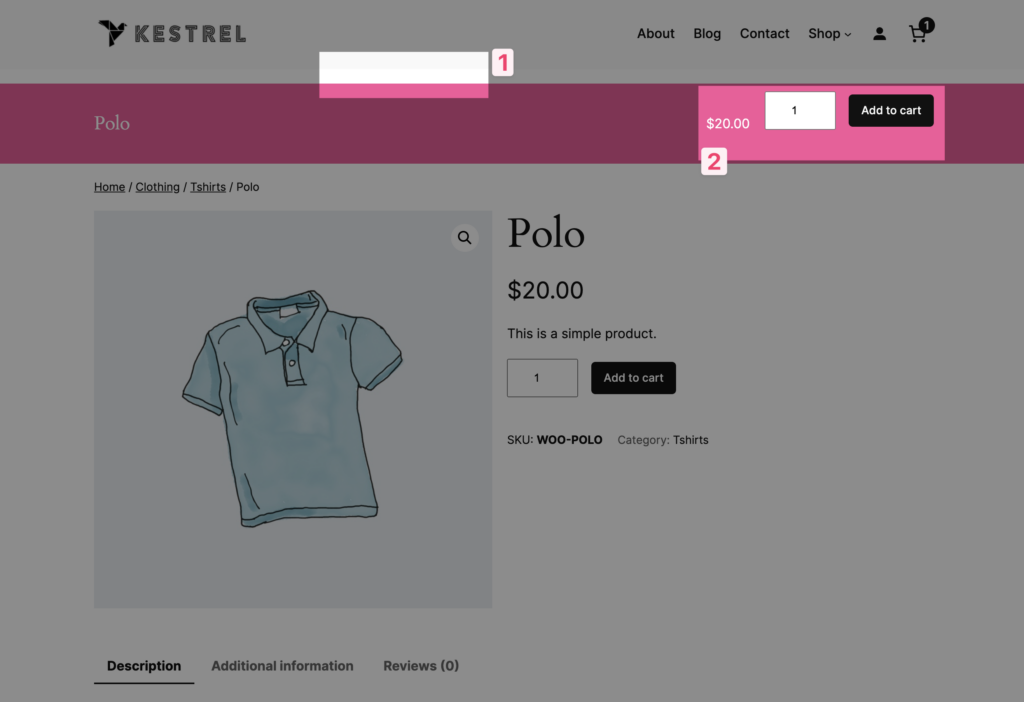
- We have a small gap between the header and the WooCommerce sticky add to cart group
- The add-to-cart form adds a large bottom margin that makes this look weird
We can fix both of these with a tiny amount of CSS. FSE themes don’t have any built-in “additional CSS” area we can add to, so we’ll manually add some styles for now to make this easy. I’ll add a “custom HTML” block to my footer with the following styles:
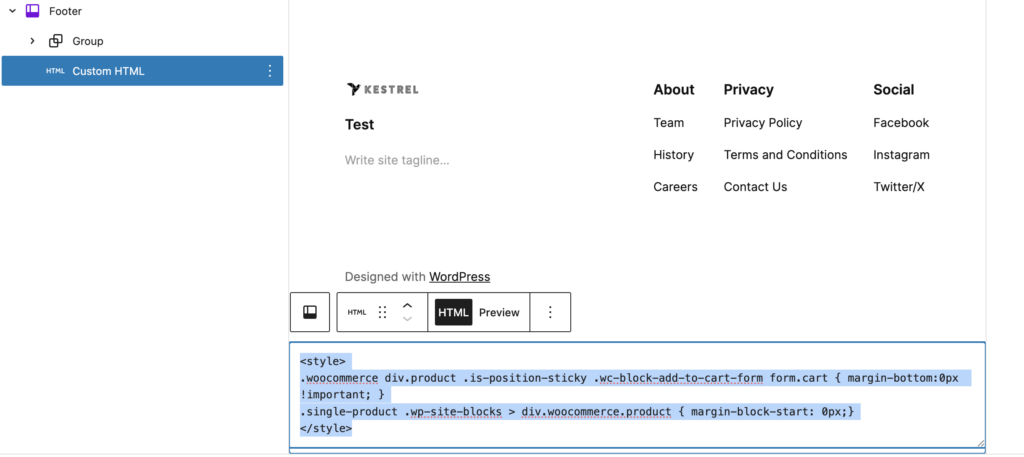
<style>
.woocommerce div.product .is-position-sticky .wc-block-add-to-cart-form form.cart { margin-bottom:0px !important; }
.single-product .wp-site-blocks > div.woocommerce.product { margin-block-start: 0px;}
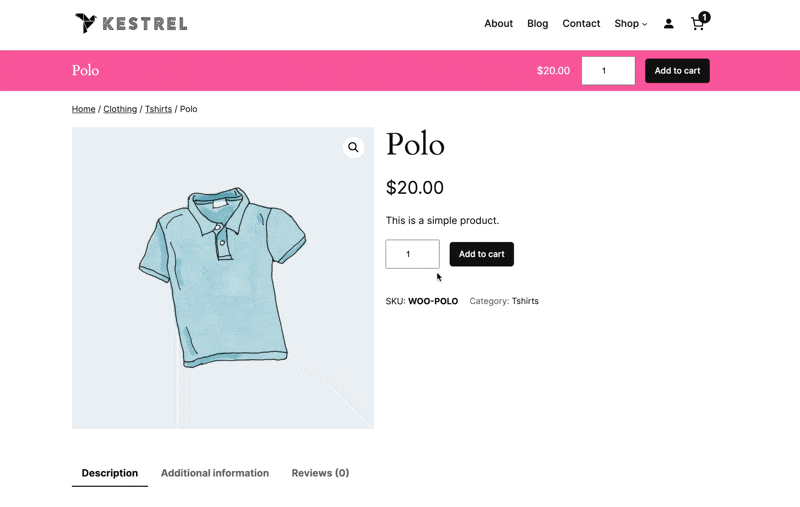
</style>And now look at that plumage! We’ve got a WooCommerce sticky add to cart header worthy of a peacock – it looks great and keeps the add-to-cart action handy as customers read your product copy.
Let us know if you add this to your site! Or if you have a better way to add short CSS snippets to an FSE site, I’d love to hear other ways to tweak the styling when block settings aren’t quite enough to get there.
Leave a Reply