


CSS controls how your store looks: colors, fonts, spacing and layout. Our plugins use WooCommerce’s default classes and styles wherever possible, so your theme styles them like the rest of your store. When you want a plugin’s output to look different, for a specific look or to match your brand more closely, add your own CSS in WordPress rather than editing the plugin’s files.
When you’d use this
- A plugin’s button, badge or notice should match your brand’s colors or fonts.
- Something a plugin adds doesn’t sit right with your theme’s layout.
How to use it
Where you add CSS depends on your theme.
Classic themes: use the Customizer
- Go to Appearance » Customize.
- Choose Additional CSS.
- Enter your CSS in the text area. The preview updates as you type.
- Click Publish.
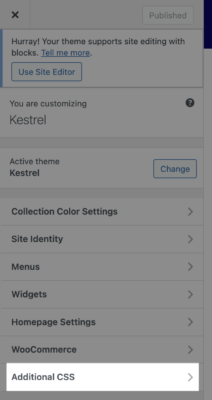
If Customize isn’t in your Appearance menu, open it directly at this address, replacing mydomain.com with your store’s domain:
https://mydomain.com/wp-admin/customize.php?return=%2Fwp-adminBlock themes: use the Site Editor
- Go to Appearance » Editor.
- Select Styles.
- Open the styles menu and choose Additional CSS.
- Enter your CSS, then click Save.
Common issues
My changes disappeared after an update
The CSS was added to the plugin’s own files, which an update replaces. Add it with one of the methods above instead, so it’s stored separately and survives updates.
A plugin looks wrong with my theme
Your theme may style WooCommerce’s elements in its own way. Try a small CSS change first; if you’re not sure what to target, contact our support team. We’ll help where we can with theme conflicts, though it isn’t always possible.