


Software Add-On turns simple WooCommerce products into licensed software. When an order is completed, it creates a license key for each copy bought, emails the keys to the customer and records each activation against an activation limit. Your software checks keys by calling your store’s license API.

Software Add-On isn’t an update server: it doesn’t deliver plugin or theme updates to your customers. If you sell WordPress plugins or themes and want customers to get updates from their dashboard, API Manager covers license keys, activations and updates, and can take over Software Add-On’s keys (see Move from WooCommerce Software Add-On).
When you’d use this
- Sell desktop software or a web app with a license key per copy.
- Limit how many computers or sites each key can be activated on.
- Sell a cheaper upgrade to customers who own an older version.
- Bring license keys from another system into WooCommerce.
Requirements
- WordPress 5.6 or later, WooCommerce 7.0 or later, and PHP 7.4 or later.
- Compatible with WooCommerce’s cart and checkout blocks and High-Performance Order Storage.
- Software products must be simple products. Variable products can’t be marked as software.
- To check keys and record activations, your software needs to call the store’s license API. Without it, the plugin still creates and emails keys.
Install and activate
Software Add-On is sold on WooCommerce.com. Install it from your WooCommerce.com account, or download it there and upload it to your store. Updates come through your WooCommerce.com connection, with no license key to enter.
For upload and update steps, follow how to install and update WooCommerce extensions.
When you activate it, the plugin creates a Lost License page at /lost-license, where customers can have their keys emailed to them again.
Set up Software Add-On
1. Mark the product as software
Edit a simple product. In the Product data box, tick Software next to Virtual and Downloadable. A Software tab appears.
If customers also download the software from your store, tick Downloadable and add the file as usual.
2. Fill in the Software tab
Open the Software tab and enter a Product ID that your software will send to the API, such as MYAPP1. Set an Activation limit if each key should work on a limited number of devices, and enter a long random string in Secret key. The other fields are optional; see Software tab settings.
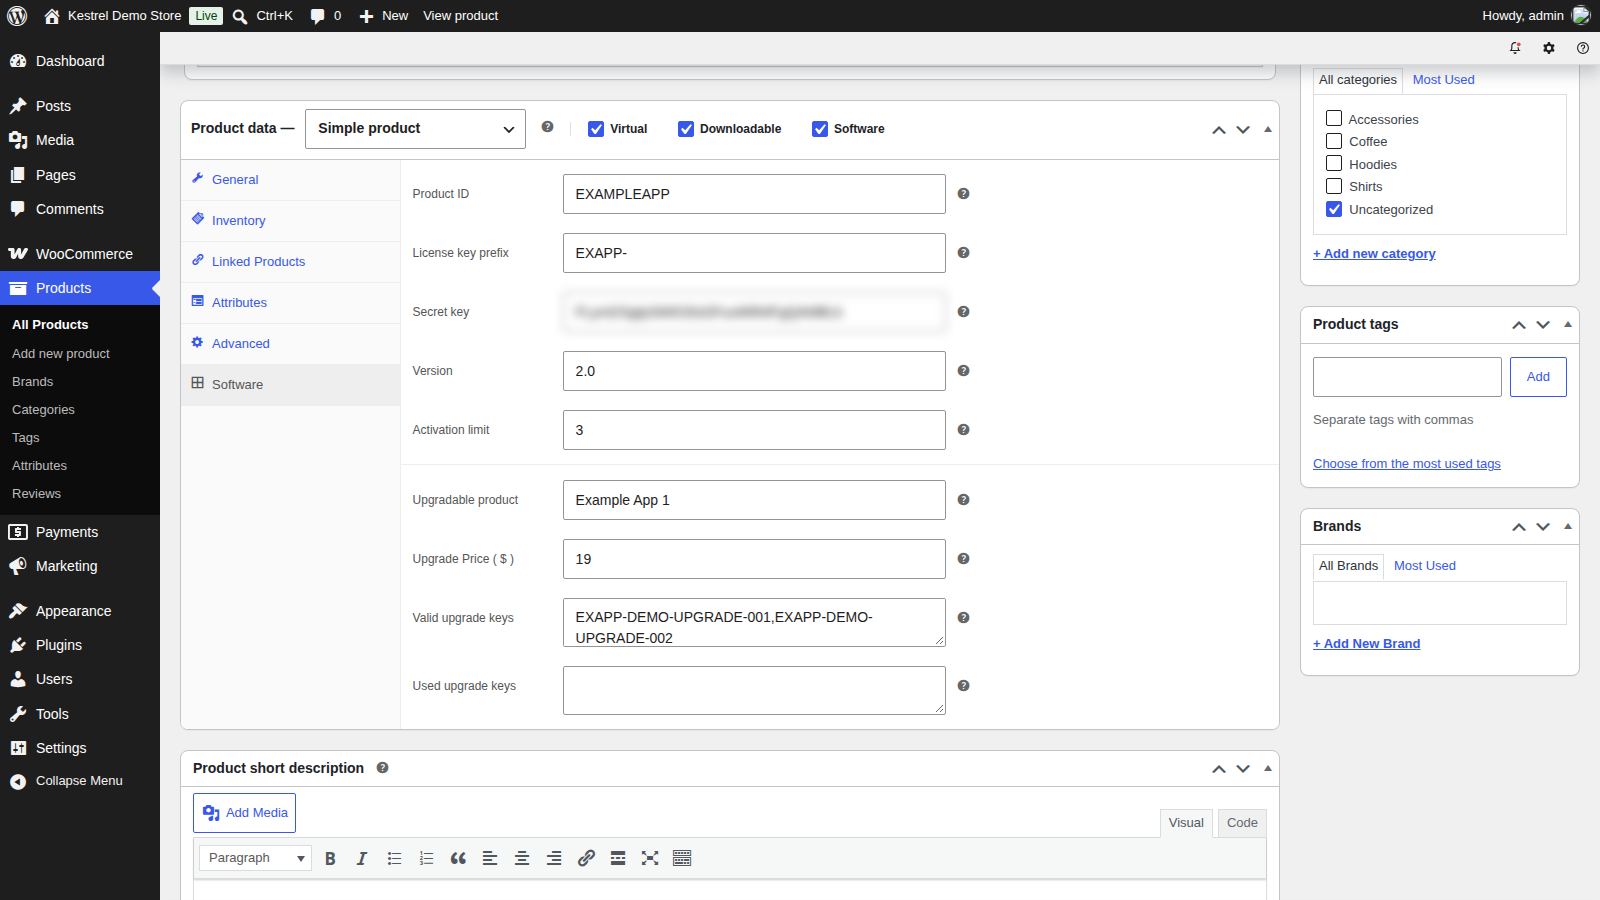
Click Update to save the product.
3. Place and complete a test order
Buy the product on your store, then go to WooCommerce » Orders, open the order and set its status to Completed. Keys are created only when an order is completed.
4. Check the key
The order screen now shows the key in the Software License Keys box, and the customer’s Completed order email lists it under License Keys. To test activation, send an activation request with the key, the billing email and your product ID.
Software tab settings
All on the Software tab of the product’s Product data box.
Product ID
The identifier your software sends with every API request, such as MYAPP1. Keep it unique to this product. Keys store the Product ID they were created with, so changing it later breaks existing keys until you update them too.
License key prefix
Optional text added to the start of every key created for this product, such as MYAPP-, including keys added on the order screen and keys from a generate_key request that doesn’t send its own prefix. Imported keys are left exactly as they are.
Secret key
The password for the API’s generate_key request, which creates keys from outside your store. Enter a long random string, keep it private, and never include it in software you ship to customers.
Version
The software’s version number, stored on each new key and shown in the key email. Changing it doesn’t update keys that already exist.
Activation limit
How many activations each key allows. Leave it blank for unlimited. Each key gets the limit set when it’s created, so changing it doesn’t affect existing keys; edit those on the order screen.
Upgradable product
The name of the product customers can upgrade from, shown in the upgrade form ("Upgrade from [name] for just [price]…"). Text only; it isn’t linked to another product.
Upgrade Price
What customers pay when they upgrade with a valid key. The upgrade form shows only when Product ID, Upgradable product and Upgrade Price are all set.
Valid upgrade keys
The keys customers may use to upgrade, separated by commas. Upgrade keys are checked against this list only, not against the keys Software Add-On created, so paste in the keys you’ll accept.
Used upgrade keys
Keys that have already been used for an upgrade, separated by commas. A key in this list is refused. See Upgrade keys for how to keep it current.
How license keys work
- When they’re created: when an order’s status changes to Completed, from either checkout. Processing and on-hold orders get no keys yet. WooCommerce completes orders automatically only when every item is virtual and downloadable, so complete other orders by hand.
- One per copy: an order for three copies gets three keys, each with its own activation limit.
- Who they belong to: each key is tied to the order and to the order’s billing email, the key’s activation email. Your software sends that email with the key.
- What they look like: the product’s prefix followed by a random ID, such as
MYAPP-0b7c3f0e-2f1a-4c8e-9a51-6c1d2e3f4a5b. - How customers get them: a License Keys section is added below the order table in the order emails WooCommerce sends after the keys exist, starting with the Completed order email. It lists each key with its activation email, version and remaining activations. There’s no list of keys in My Account.
- Renewals: with WooCommerce Subscriptions, renewal orders don’t create new keys; the keys from the first order stay valid. Keys stay active when a subscription ends or is canceled. To cut off access, deactivate its activations on the order screen.
The Lost License page
The Lost License page shows a form where a customer enters their email address and clicks Email License Keys. The plugin emails "Your license keys" to that address, listing every key whose activation email matches, or shows "No license keys were found for your email address".
The form only searches activation emails. A customer whose email has changed since they bought needs you to update the key’s Activation Email on the order screen.
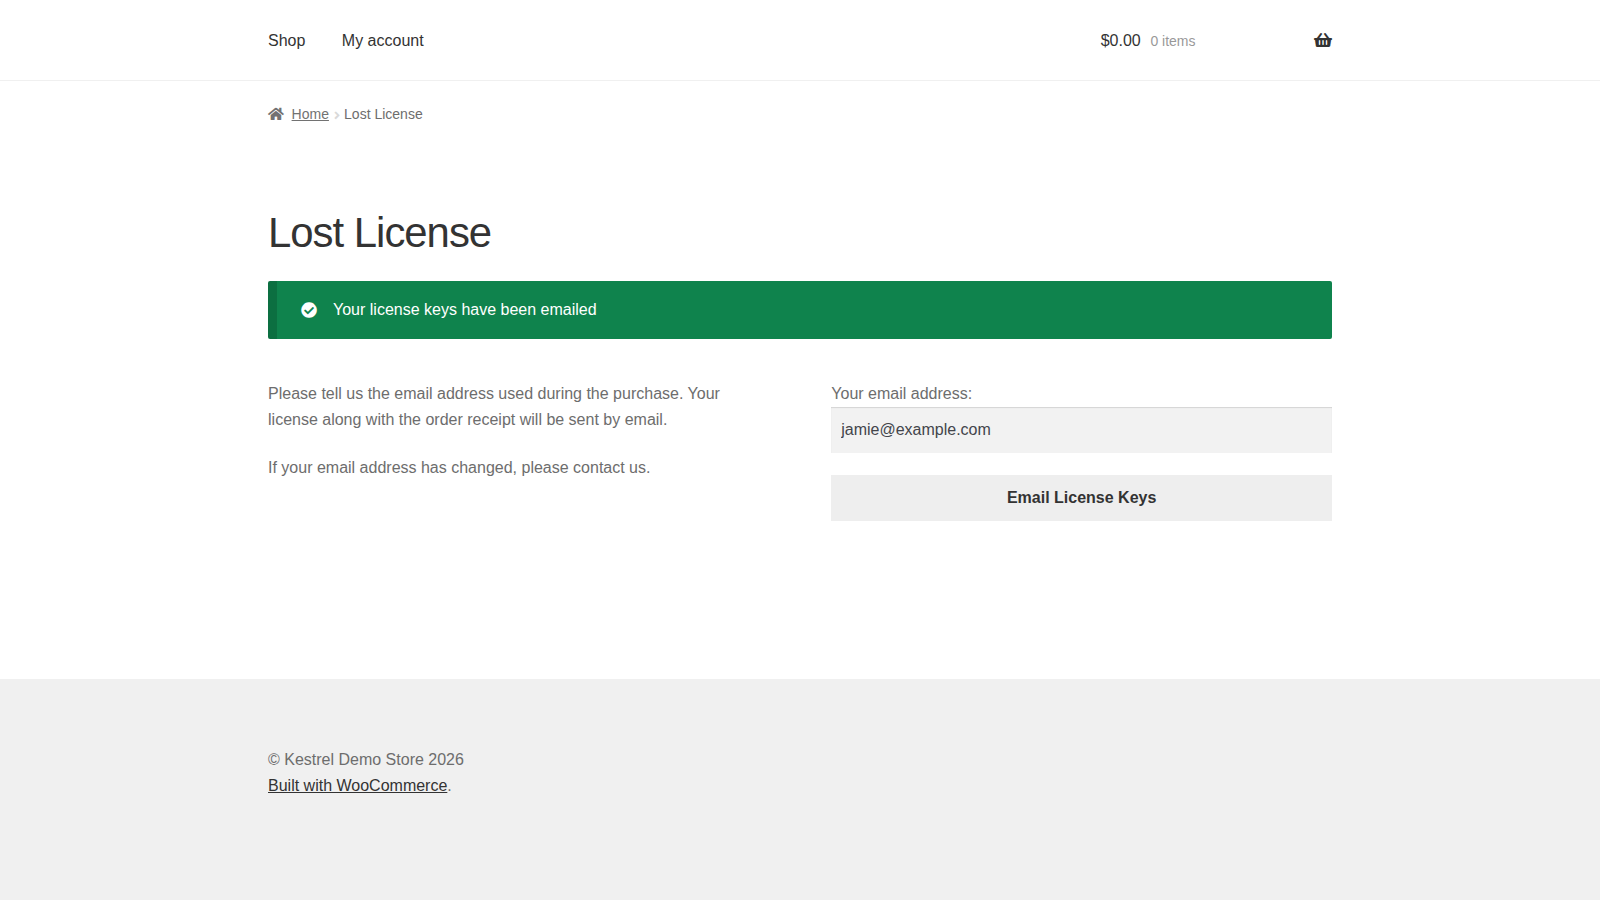
To move the form to another page, add the [woocommerce_software_lost_license] shortcode there.
Upgrade keys
When Product ID, Upgradable product and Upgrade Price are set, the product page shows "Upgrading from an old version?" below the add to cart button, with Activation email: and License Key: fields and an Upgrade button.
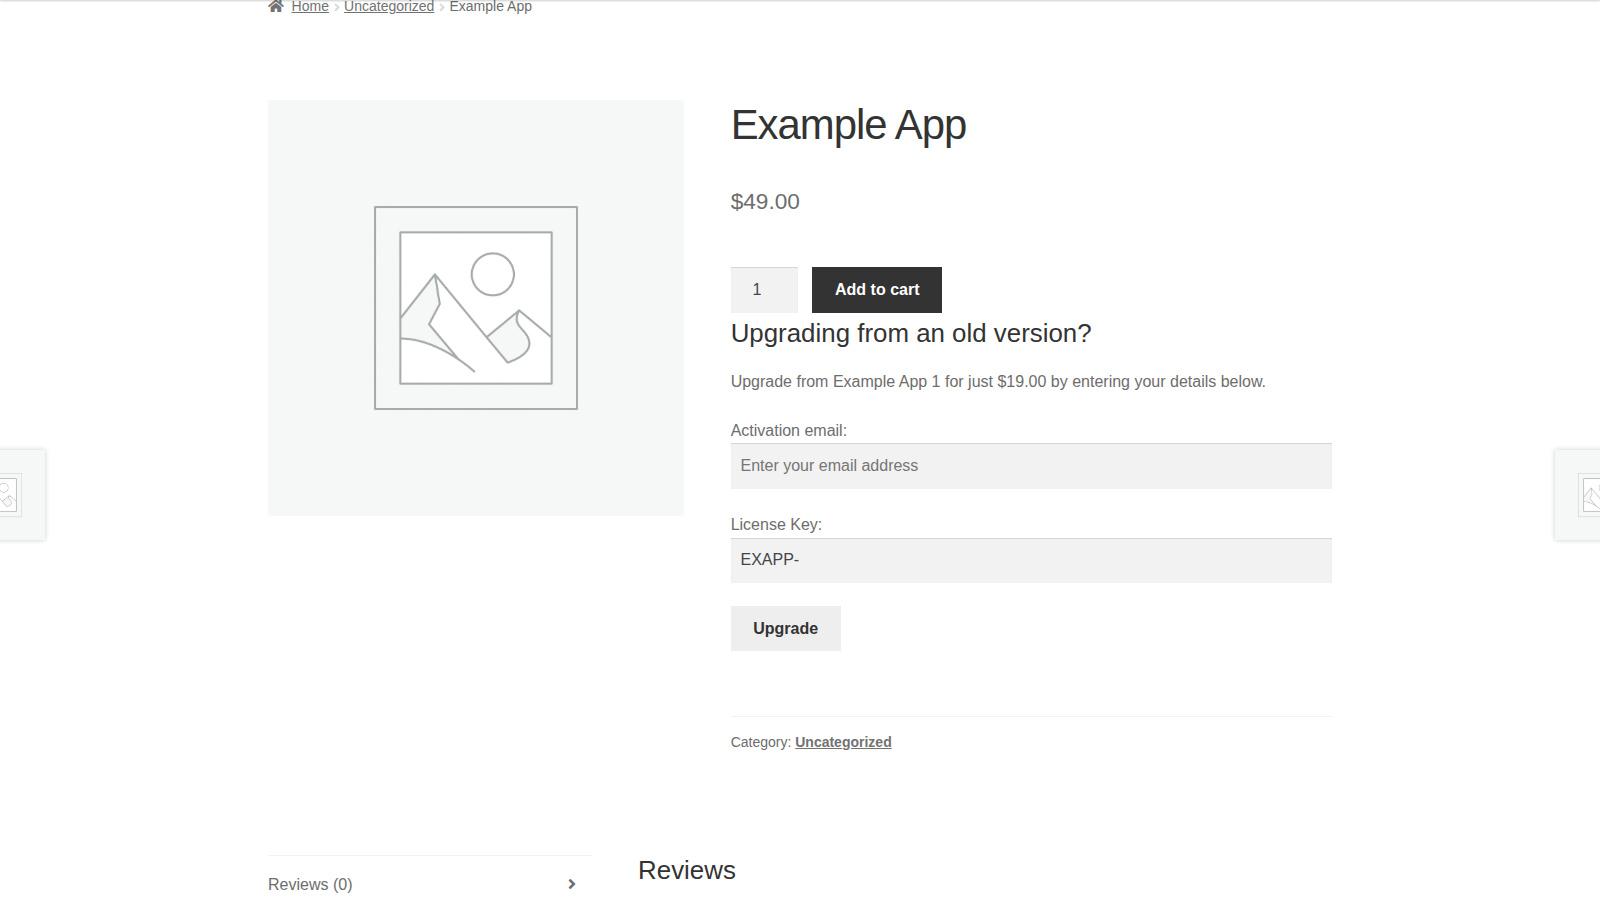
When the customer fills in both fields and clicks Upgrade, the plugin checks the key against Valid upgrade keys and Used upgrade keys, then adds the product to the cart at the upgrade price, one per order. The cart and order show Upgrading from, Upgrade key and Upgrade email. When the order is completed, it gets new keys like any other order.
If either field is left empty, the product is added to the cart at its full price, so ask customers to fill in both.
After an upgrade order is placed, check the product’s key lists. Move the key the customer used from Valid upgrade keys to Used upgrade keys by hand, and put back any other valid keys that are missing, so the same key can’t be used twice. The key used is shown as Upgrade key on the order’s item.
Manage keys and activations
On the order screen
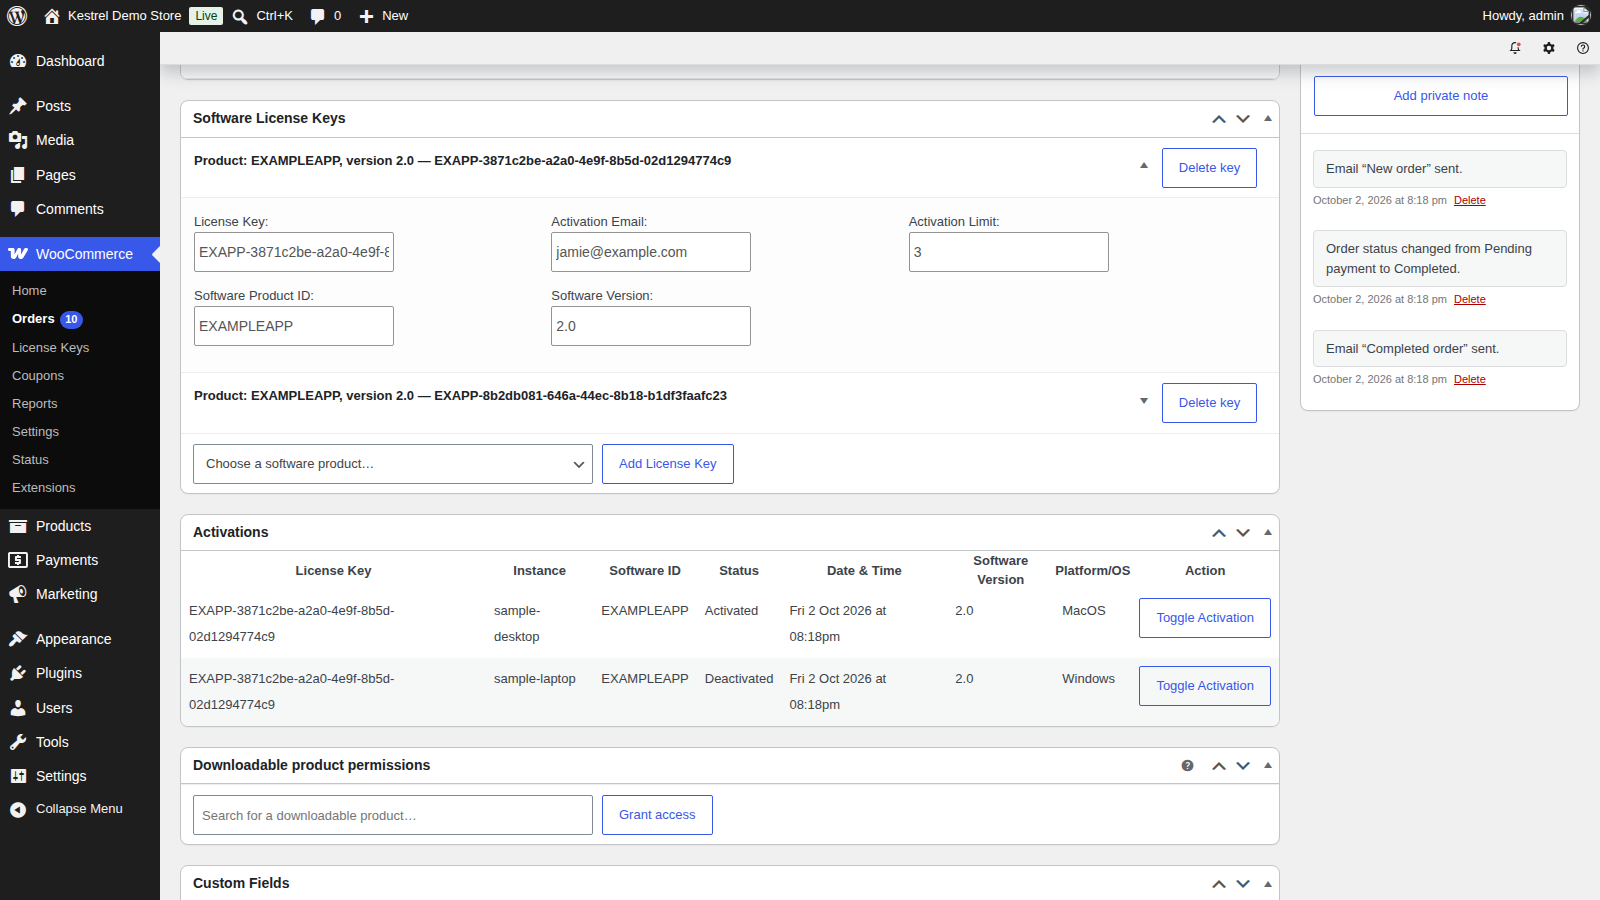
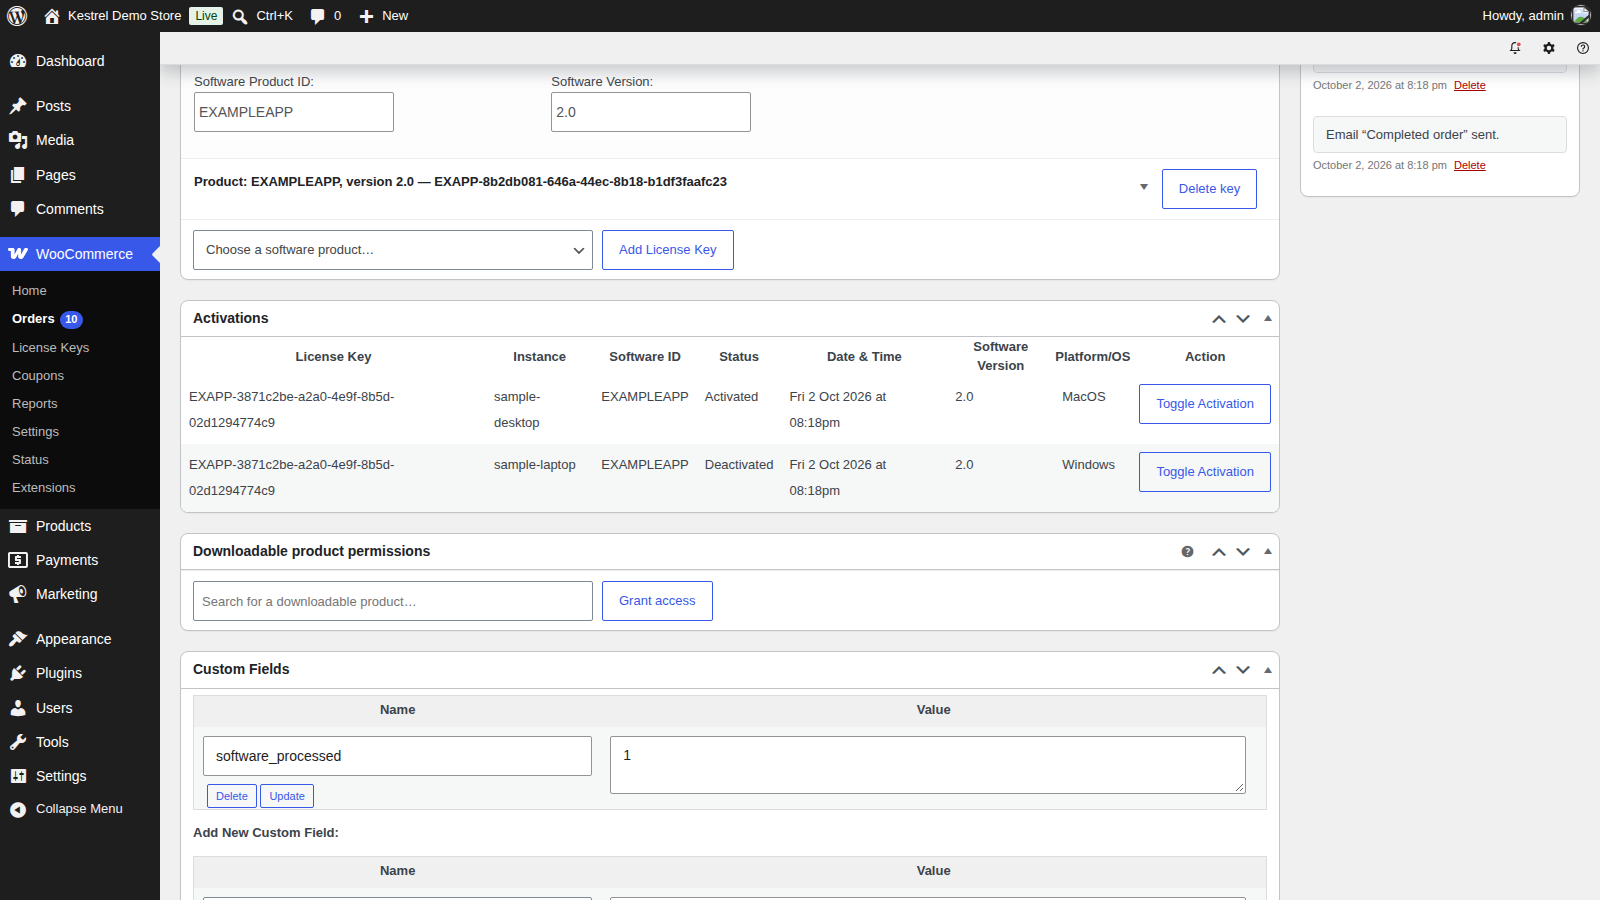
The Software License Keys box lists the order’s keys. Click a key to expand it and edit its License Key, Activation Email, Activation Limit, Software Product ID or Software Version, then click Update to save the order. Delete key removes the key and its activations straight away.
To add a key, choose a product in Choose a software product… and click Add License Key. The new key uses the order’s billing email and is saved straight away, whatever the order’s status.
The Activations box lists each activation of the order’s keys with its instance, status, date, software version and platform. Toggle Activation switches one between Activated and Deactivated, which frees or uses up one of the key’s activations.
The License Keys screen
Go to WooCommerce » License Keys to see every key in the store, 50 to a page, with its activation email, product ID, version, activation limit, activations remaining, order and date. Sort by date, order, email or product ID. To delete keys, tick them and use the Delete bulk action. To edit a key, open its order.
Reports
Go to WooCommerce » Reports and open the Software tab:
- Overview shows software sales (including tax) from on-hold, processing and completed orders, copies sold, total license keys, total and active activations, and recent activations.
- Activations lists up to 50 activations between the From: and To: dates, this month by default.
Import license keys
To bring keys from another system, go to Tools » Import and run WooCommerce Software License Keys (CSV). Upload a CSV file whose first row names its columns:
- Required:
software_product_id(a Product ID that exists on a software product),activation_emailandlicense_key. - Optional:
order_id,software_versionandactivations_limit. Version and limit default to the product’s values. A key without an order ID isn’t tied to an order.
Keys are imported exactly as written, without the product’s prefix. The results table shows each row as imported or skipped, with "Missing license_key" or "Invalid email" for rows that can’t be imported. You can’t import a pool of keys to hand out on future orders: every key you import belongs to the activation email in its row.
Privacy
Software Add-On stores each key’s activation email and order, and each activation’s instance, platform and time. When you erase a customer’s personal data under Tools » Erase Personal Data, it clears the activation email and order from keys whose activation email matches. Those keys stop working with the API.
Common issues
An order has no license keys
Keys are created only when the order’s status changes to Completed. Check that:
- The order is Completed, not processing or on hold.
- The product had Software ticked when the order was completed.
- The order isn’t a subscription renewal, which reuses the first order’s keys.
To add a key to an existing order, use Add License Key in the Software License Keys box.
The upgrade form doesn’t appear
Set Product ID, Upgradable product and Upgrade Price on the product’s Software tab, and make sure Software is ticked.
"This upgrade key is not valid. If you need assistance please contact us."
The key isn’t in the product’s Valid upgrade keys list. Upgrade keys are checked against that list only, so add the customer’s key to it.
"This upgrade key has been used already. If you need assistance please contact us."
The key is in Used upgrade keys. Remove it from that list if the customer should be able to upgrade again.
A customer upgraded but paid the full price
They left Activation email: or License Key: empty, so the product was added as a normal purchase. Refund the difference, or cancel the order and ask them to upgrade again with both fields filled in.
A customer’s key email didn’t arrive
Keys are added to emails sent after the order is completed. Ask the customer to use the Lost License page, or open the order, choose Send order details to customer in the Order actions box and click Update.
The Lost License page finds no keys
The page searches each key’s activation email, which is the billing email at purchase. If the customer’s email has changed, update Activation Email on the order screen.
Activation fails with "Exceeded maximum number of activations"
The key has no activations left. Deactivate old activations with Toggle Activation on the order screen, raise the key’s Activation Limit there, or have the software send a deactivation request.
The API says "Software has been deactivated"
The key’s order isn’t Completed, for example because it was refunded, canceled or set back to processing. Keys added without an order skip this check.
Keep learning
- Software Add-On developer reference (the license API your software calls)
- Get started with API Manager (license keys plus plugin and theme updates)
- How to install and update WooCommerce extensions