


Splash Popup shows targeted popups on your WooCommerce store: a welcome discount, a newsletter form, a flash sale, a free shipping nudge on the cart. You design each popup in the block editor, then choose who sees it, on which pages, and what opens it. One popup shows per page view, picked by priority.
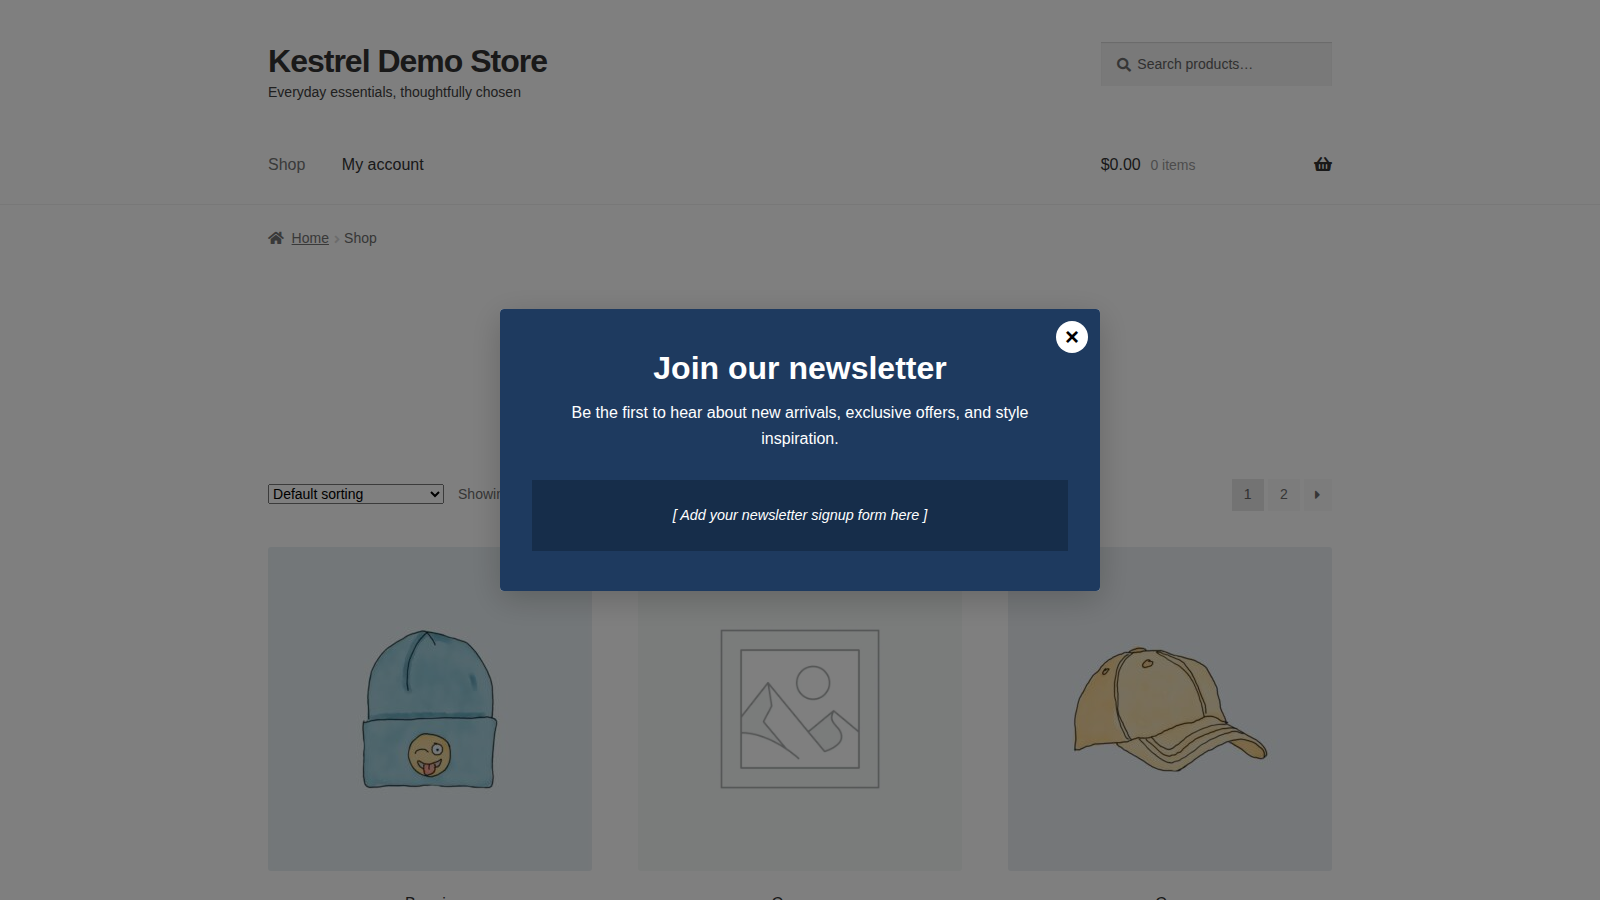
Splash Popup displays content; it doesn’t collect emails or create coupons itself. For a signup form, add your form or newsletter plugin’s block to the popup, and for a discount, create the coupon in WooCommerce and show its code.
When you’d use this
- Offer first-time visitors a discount code.
- Grow your list with a newsletter form from your email marketing plugin.
- Run a flash sale popup that starts and stops on a schedule.
- Remind shoppers on the cart page how close they are to free shipping.
- Show a last-chance offer to desktop visitors who are about to leave.
- Show a notice only to visitors from certain countries.
Requirements
- WordPress 6.3 or later, WooCommerce 8.5 or later, and PHP 7.4 or later.
- Compatible with WooCommerce’s cart and checkout blocks and High-Performance Order Storage.
- Country targeting needs WooCommerce’s MaxMind geolocation set up (WooCommerce » Settings » Integration » MaxMind Geolocation).
- Store administrators and shop managers can create and edit popups.
Install and activate
How you get updates depends on where you bought Splash Popup:
- Bought on kestrelwp.com: download the plugin from the Licensed downloads tab of your kestrelwp.com account and install it. Then go to Settings » Splash Popup for WooCommerce activation and activate the key from your License keys tab to receive updates. See using sites against your activation limit for how activations count.
- Bought on WooCommerce.com: install the plugin from your WooCommerce.com account. Updates come through your WooCommerce.com connection, with no license key to enter.
For upload, FTP and update steps, follow how to install and update WooCommerce extensions.
Set up your first popup
1. Create the popup
Go to WooCommerce » Popups and click Add new popup. Splash Popup creates a draft named "New popup" and opens the popup editor. Give it a Title you’ll recognize; visitors never see it.

2. Add the content
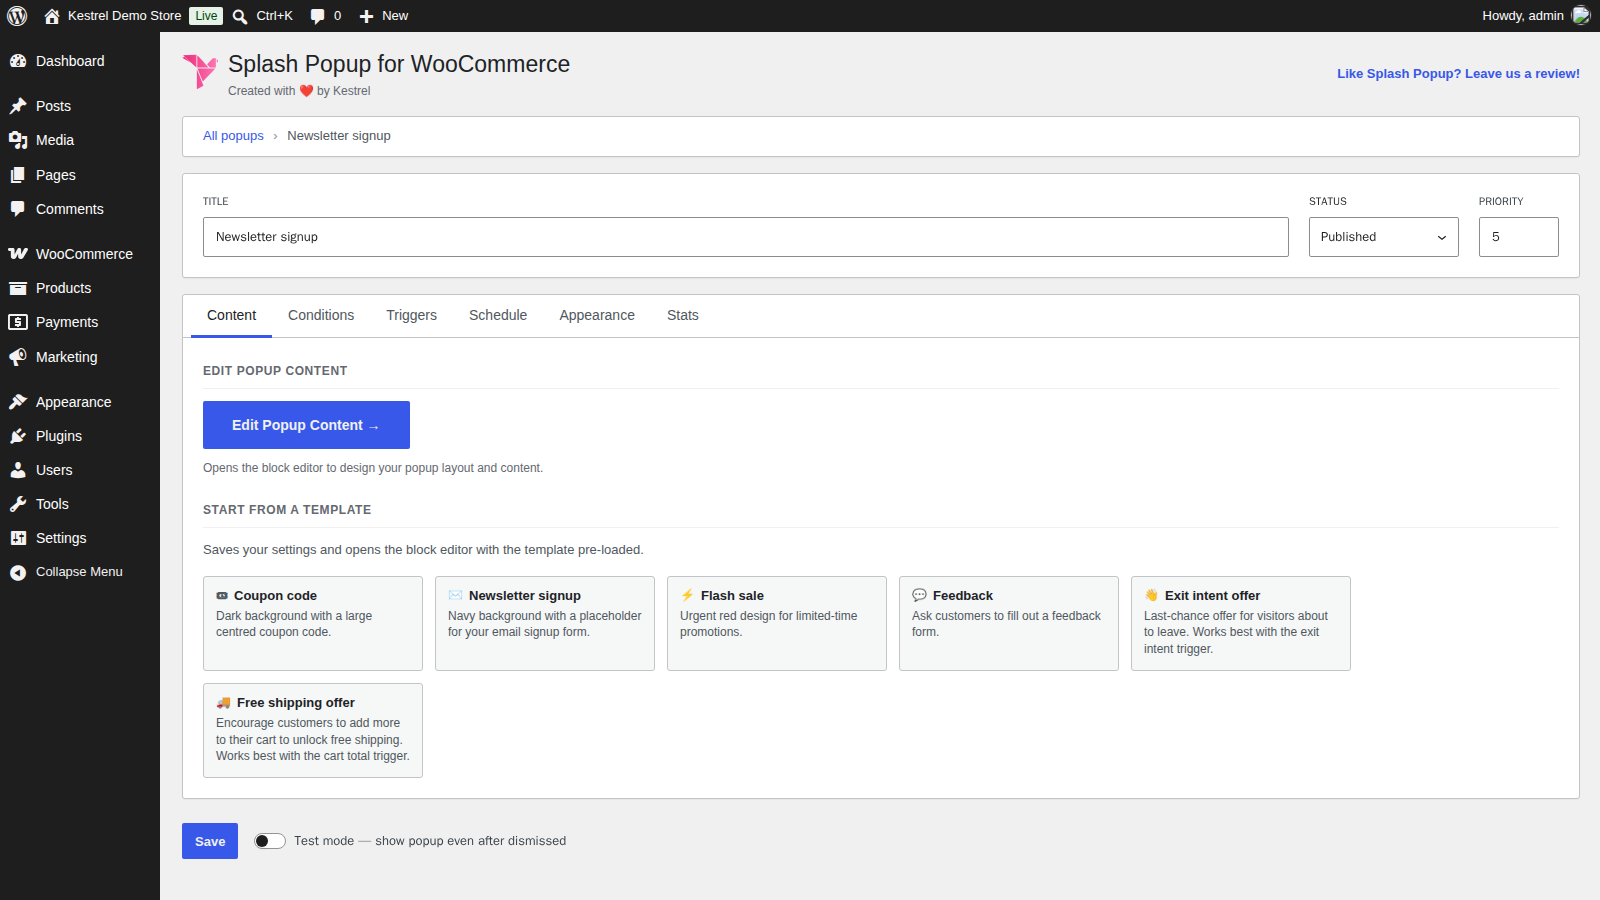
On the Content tab, pick a template under Start from a template, or click Edit Popup Content to start from a blank block editor. Either way, Splash Popup saves your settings first, then opens the block editor.
Build the popup with any blocks. If you used a template, replace its placeholder text: the coupon templates show sample codes, and the newsletter and feedback templates hold a placeholder box for your own form block. When you’re done, click ← Back to popup settings in the admin bar.
3. Choose who sees it and where
On the Conditions tab, set User status, Page targeting and the devices the popup shows on. Leave the defaults to show it to every visitor on every page.
4. Choose what opens it
On the Triggers tab, pick an option under Fire popup when. Page load with no delay opens the popup as soon as the page loads. Cookie expiration (days) sets how long the popup stays hidden after a visitor closes it.
5. Publish and check it
Set Status to Published and click Save. To see the popup without it hiding after you close it, turn on Test mode — show popup even after dismissed, then visit a matching page in a private browser window. Turn Test mode off once you’re happy with the popup.
How Splash Popup chooses which popup to show
On each page view, Splash Popup checks your published popups in Priority order, lowest number first. It picks the first popup that has content and whose schedule, audience (user status and roles), page targeting and country all match. Only that popup loads on the page, and if none match, nothing loads.
The browser then decides whether the chosen popup opens. It checks whether this visitor already closed it, whether their screen size matches the popup’s devices, and whether the trigger fires.
Those browser checks happen after the choice, so if the chosen popup was already closed, doesn’t target this device, or never triggers on this page, no other popup shows in its place. Two habits keep popups from blocking each other:
- Give broad popups (shown on all pages) a higher priority number than targeted ones, so the targeted popup wins where it applies.
- Keep popups that would compete for the same pages apart with page targeting or a schedule.
Popups with the same priority have no set order, so give each popup its own number.
Popup editor settings
The top of the popup editor holds the popup’s title, status and priority. The tabs below it hold everything else.
Title
A name for your own reference in the popups list. Visitors don’t see it.
Status
Published popups can show on your store. Draft popups are saved but never shown. Saving a draft shows "This popup is in draft status and won’t be displayed until published."
Priority
A whole number, 10 by default. A lower number wins when more than one popup matches the same visitor and page.
Test mode — show popup even after dismissed
Shows the popup every time, even to visitors who closed it. The toggle sits next to Save, and the popups list shows On in its Test mode column while it’s enabled.
Content tab
Edit Popup Content
Saves the popup, then opens it in the WordPress block editor, where you can use any blocks or shortcodes. If the popup’s status is Published when you click it, the popup is live with whatever content it has.
Start from a template
Six starter layouts: Coupon code, Newsletter signup, Flash sale, Feedback, Exit intent offer and Free shipping offer. Applying one asks you to confirm, then replaces the popup’s current content. The templates are layouts only:
- Coupon code and Exit intent offer show the sample codes
SAVE10andSTAYFOR15. Create a matching coupon under Marketing » Coupons, then edit the code in the popup. - Newsletter signup and Feedback hold a placeholder box. Replace it with your form plugin’s block or shortcode.
- Flash sale includes a Shop the sale button. Add its link in the block editor.
Conditions tab
User status
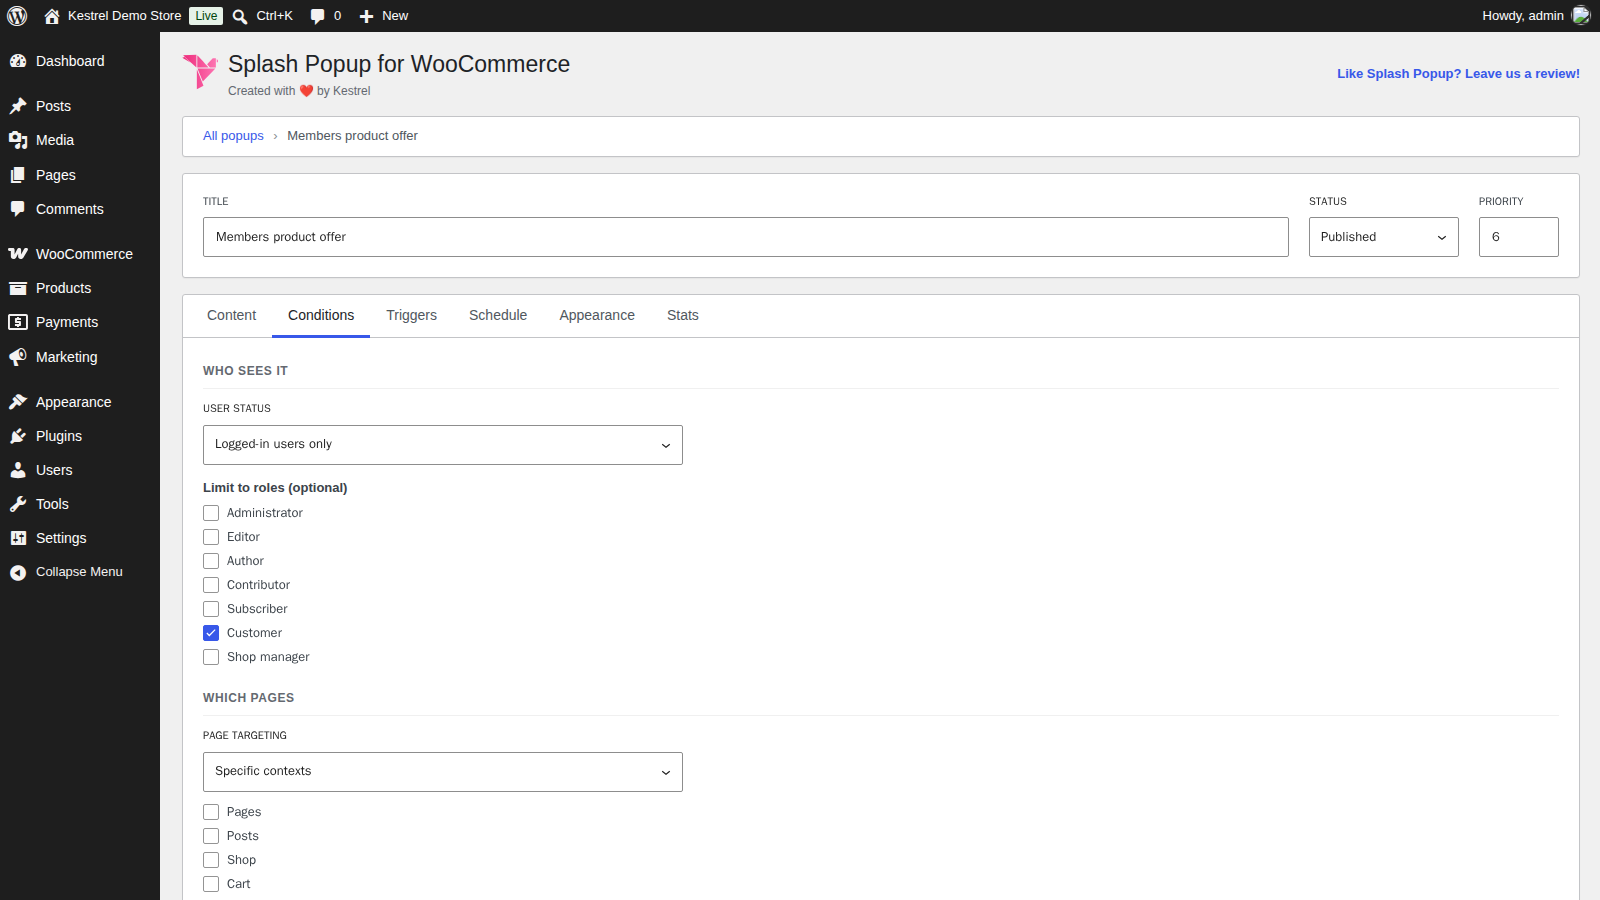
Choose All visitors, Logged-in users only or Logged-out visitors only.
Limit to roles (optional)
Appears with Logged-in users only. Pick one or more user roles, such as Customer, to show the popup only to those roles.
Page targeting
All pages makes the popup eligible everywhere. Specific contexts limits it to the areas you tick:
- Pages: any WordPress page, including your cart, checkout and My account pages. Add pages under Specific pages (optional) to limit it to those.
- Posts: single blog posts. Your blog’s index and archive pages don’t count.
- Shop: the main shop page.
- Cart and Checkout: those pages.
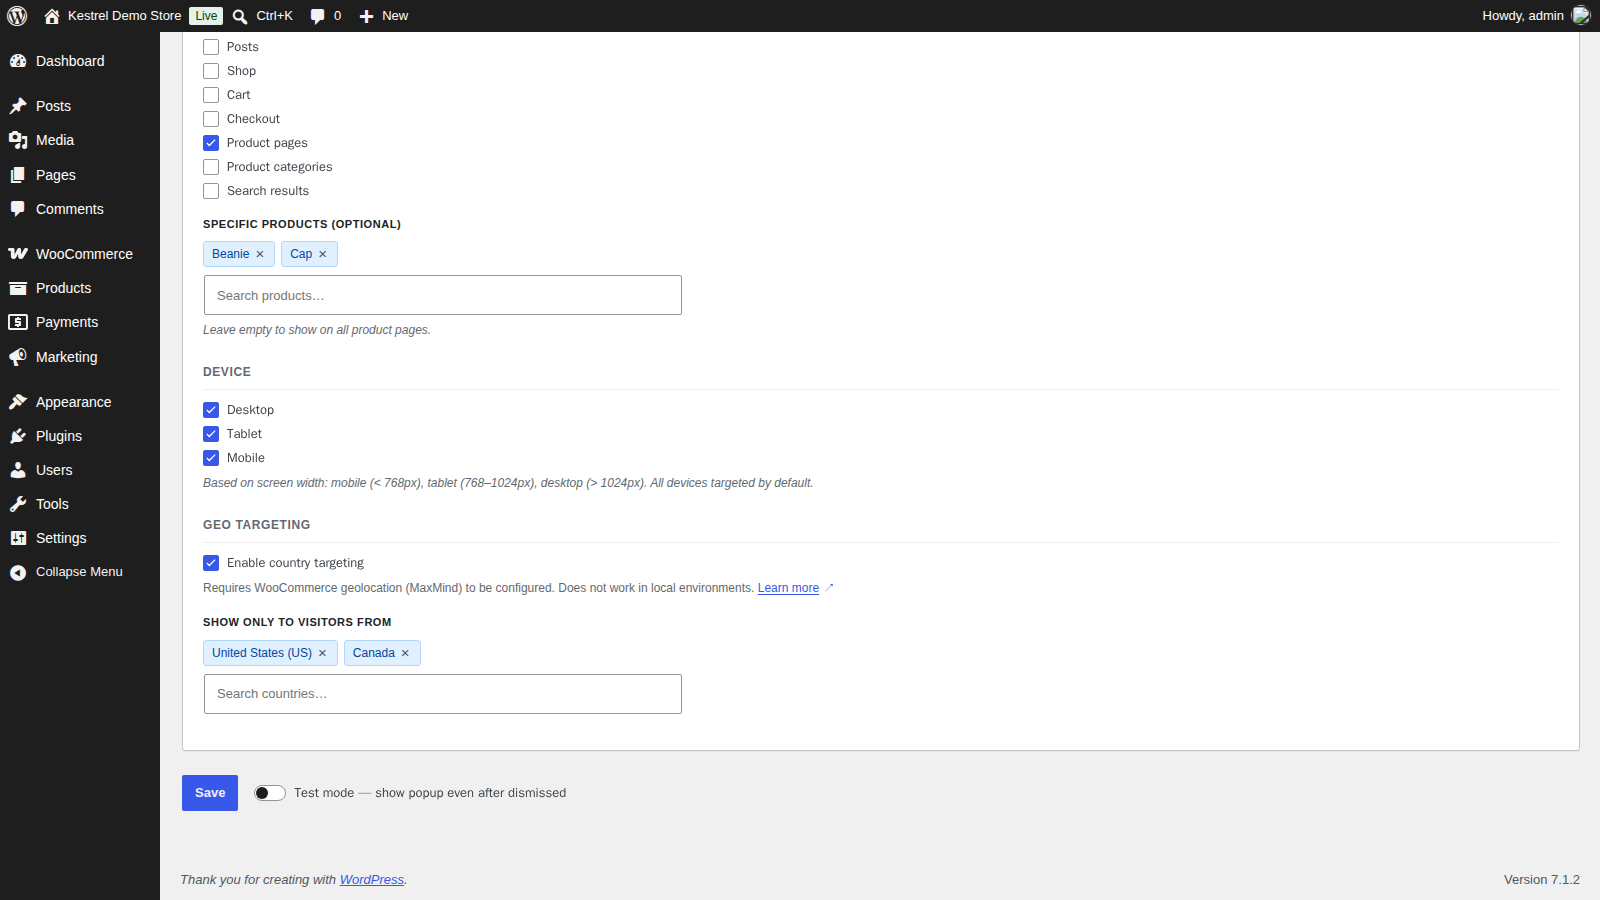
- Product pages: single product pages, optionally limited with Specific products (optional).
- Product categories: product category archive pages, optionally limited with Specific product categories (optional).
- Search results: search results pages. Specific search term (optional) shows the popup only when the search matches that term exactly.
If you save Specific contexts with nothing ticked, the popup switches back to All pages.
Device
Desktop (wider than 1024px), Tablet (768px to 1024px) and Mobile (narrower than 768px), all on by default. If you untick all three, the popup shows on every device.
Enable country targeting
Shows the popup only to visitors from the countries you pick under Show only to visitors from. If you enable it without picking a country, the popup shows to everyone. Visitors whose country can’t be determined don’t see the popup. Country targeting relies on WooCommerce’s geolocation, so it doesn’t work on a local development site.
Triggers tab
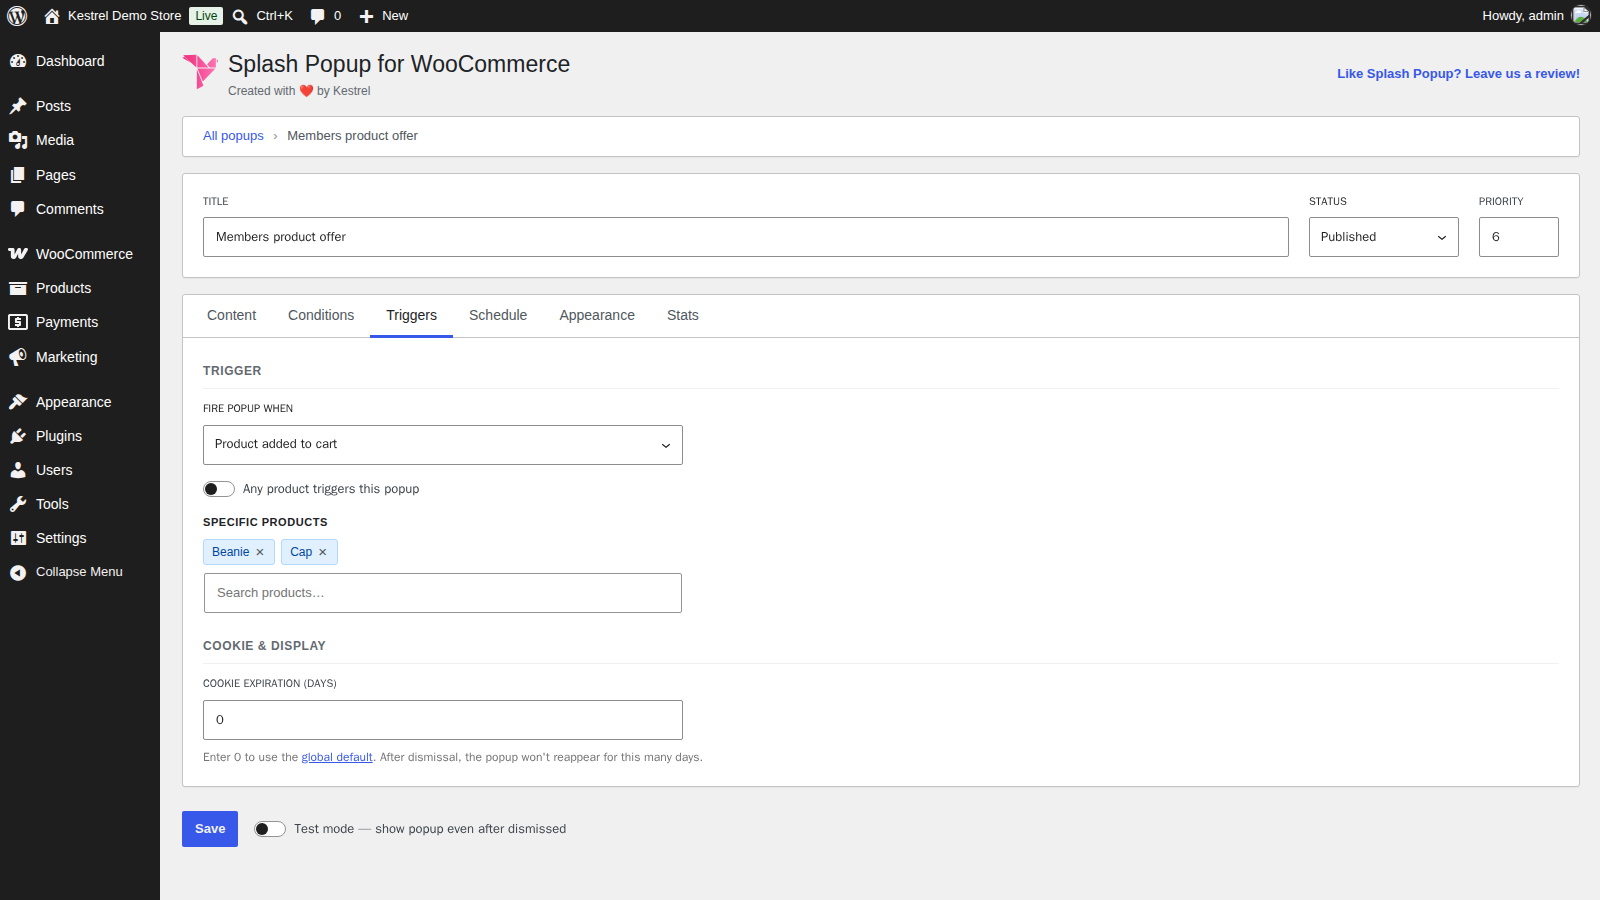
Fire popup when
- Page load: opens when the page loads, after the Delay (seconds) you set.
- Scroll depth: opens once the visitor has scrolled the Scroll depth (%) you set (50 by default).
- Cart total reached: opens on the cart page once the cart total reaches the Minimum cart total. Include Cart in your page targeting. The total checked is the order total, including shipping and tax. The check runs when the cart page loads and again whenever the cart totals update (after a quantity, coupon or shipping change).
- Product added to cart: opens when a shopper adds a product without leaving the page, such as the add to cart buttons on your shop and category pages. The standard add to cart button on a single product page reloads the page, so it doesn’t open the popup. Include the pages where shoppers add products in your page targeting.
- Exit intent: opens when the visitor’s mouse leaves the top of the browser window. Touch screens have no mouse pointer, so it never opens on phones or tablets.
Any product triggers this popup
Appears with Product added to cart. Turn it off to pick Specific products that open the popup. On stores using the cart block, only Any product opens the popup.
Cookie expiration (days)
How many days the popup stays hidden after a visitor closes it with the close button, a click on the background, or the Escape key. Leaving a page without closing the popup doesn’t count, so it shows again on their next page view. 0 uses the global Cookie expiration setting.
Schedule tab
Enable date range
Limits the popup to a Start date / time, an End date / time, or both. Times use your site’s timezone, shown at the top of the tab. Turn the toggle off to run the popup with no dates.
Appearance tab
Override global defaults for this popup
Each popup uses your store’s global defaults until you turn this on. The override shows the same appearance settings (cookie expiration lives on the Triggers tab instead), and its close button settings are labeled Close button icon color and Close button background.
When you turn the override on, set each field you want to change, because untouched fields keep using the global defaults.
Stats tab
Shows Total views, Today, Yesterday, Last 7 days, Last 30 days and Last 365 days, plus a chart of the last 30 days. A view counts each time the popup opens, including your own visits and Test mode previews, so click Reset stats after testing. Resetting can’t be undone. Splash Popup counts views only; it doesn’t track clicks or sales.
Global defaults
Go to WooCommerce » Settings » Splash Popup. These apply to every popup that doesn’t override them.
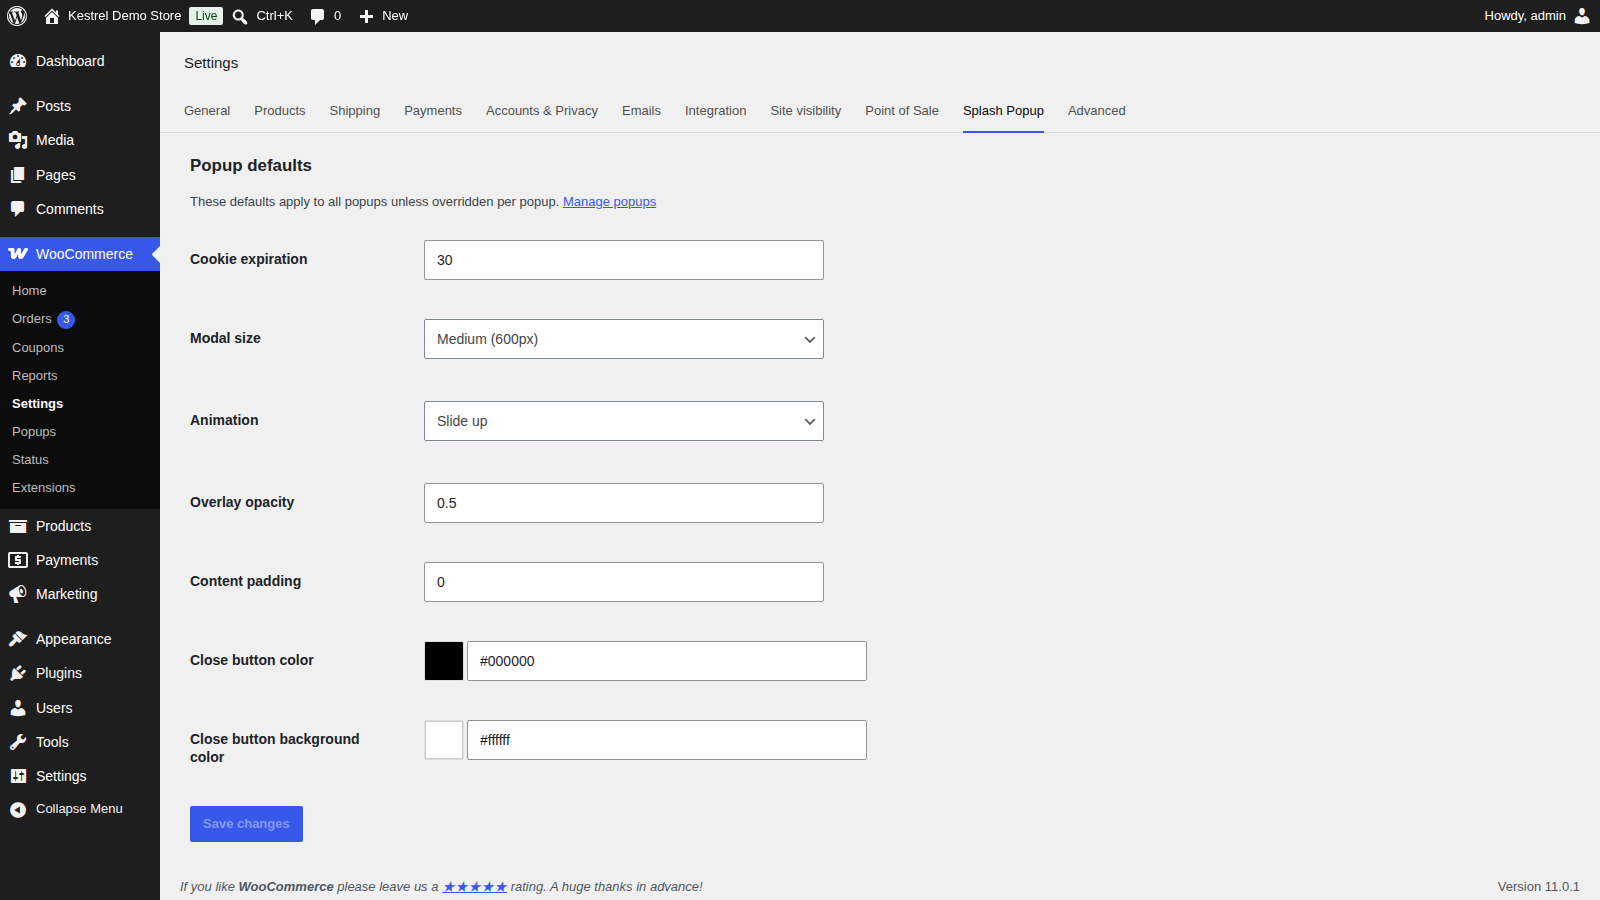
Cookie expiration
Days before a popup shows again to a visitor who closed it. Default 30. At 0, the popup stays hidden until the visitor closes their browser.
Modal size
Small (400px), Medium (600px, the default), Large (800px) or Fullscreen. Fullscreen spans the full width of the screen and up to 90 percent of its height, and scrolls if the content is taller.
Animation
Slide up (the default), Fade, Zoom or Scale.
Overlay opacity
How much the page behind the popup is dimmed, from 0 (not at all) to 1 (fully covered). Default 0.5.
Content padding
Space around the popup’s content, from 0 to 120px in steps of 4. Default 0.
Close button color
The color of the close icon. Default black.
Close button background color
The color behind the close icon. Default white.
What customers see
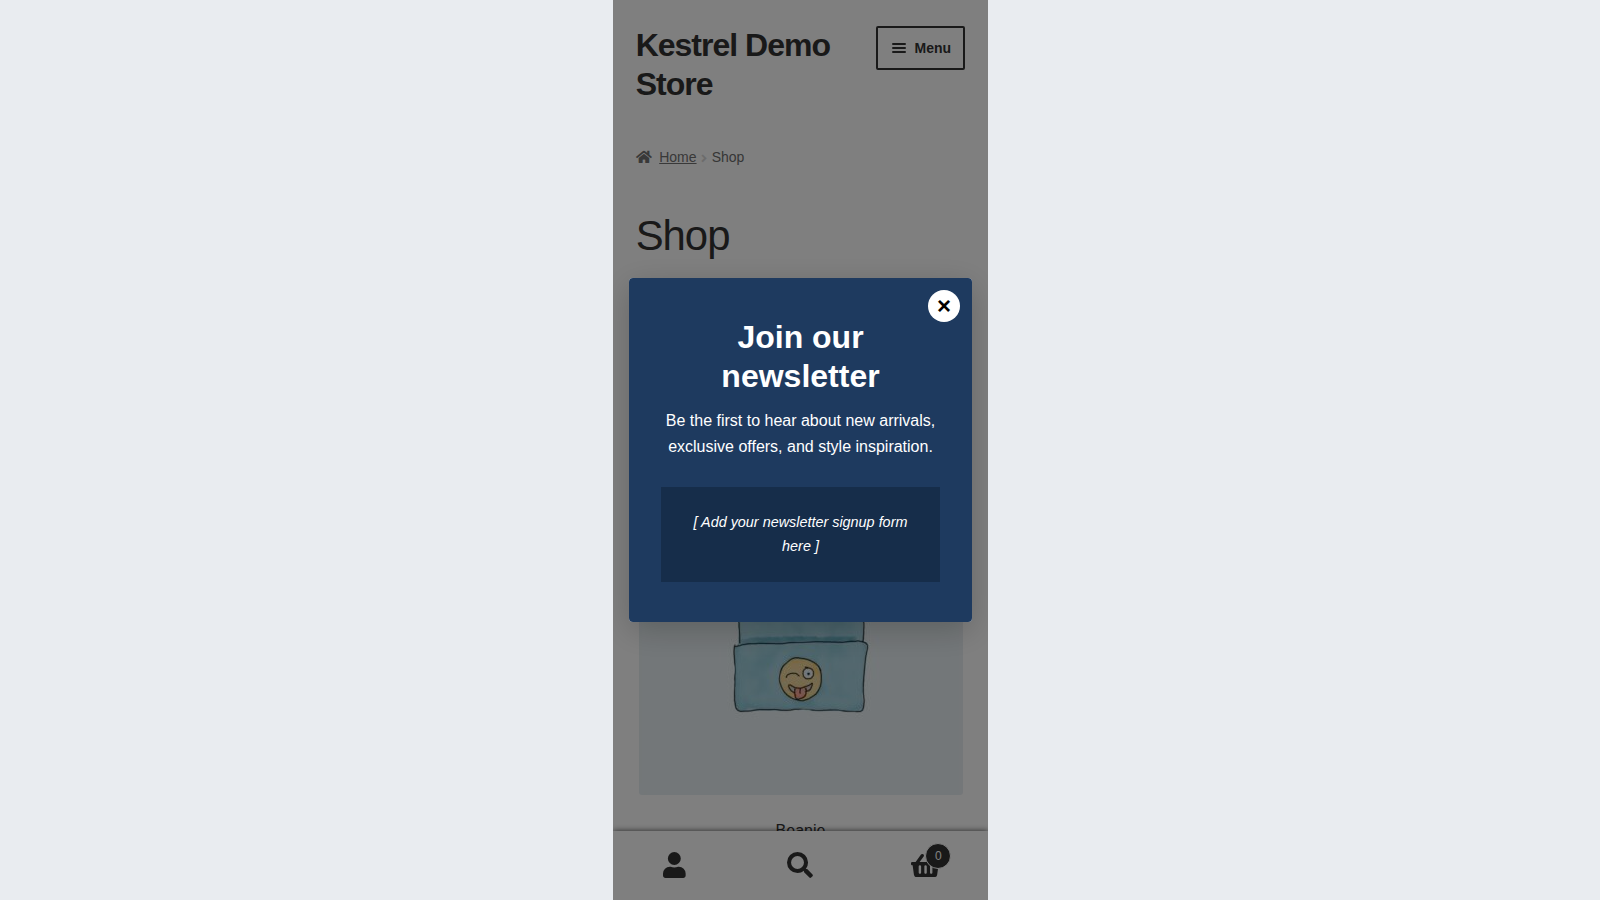
The popup opens over the page with your chosen animation and overlay. Visitors close it with the close button, by clicking the background, or with the Escape key, and it stays closed for the cookie expiration period on that browser.
Upgrade from version 1.x
Version 2.0.0 replaced 1.x’s page-based popups with the Popups list. When you update, each 1.x popup becomes a published popup that opens on page load on all pages, keeping your 1.x cookie expiration:
- The logged-in customer popup gets priority 10, limited to logged-in users with the Customer role.
- The logged-in popup gets priority 20.
- The logged-out popup gets priority 30.
If a 1.x popup was set to always display, its new popup has Test mode on. Check the Test mode column in WooCommerce » Popups and turn it off where you don’t want the popup to show every time. The WordPress pages your 1.x popups used aren’t deleted, so unpublish them if you no longer need them.
Common issues
The popup doesn’t appear
Work through these in order:
- Status is Published, and you clicked Save.
- The popup has content. A popup with nothing in it never shows.
- Today falls inside the popup’s schedule.
- You match the popup’s User status, roles, page targeting, device and country. A private browser window shows what logged-out visitors see.
- You haven’t already closed it. Turn on Test mode to rule this out.
- No other popup with a lower priority number matches the same page (see How Splash Popup chooses which popup to show).
- The trigger can fire on this page. For example, Cart total reached only fires on the cart page.
A second popup never shows after visitors close the first
Only one popup is chosen per page view, before the browser checks whether it was closed. Separate the two popups with page targeting or a schedule.
The cart total popup doesn’t open
Include Cart in the popup’s page targeting, and set Minimum cart total against the cart’s order total, which includes shipping and tax.
The product added popup doesn’t open on product pages
The standard add to cart button on a single product page reloads the page, which doesn’t open the popup. It opens for add to cart buttons that work without leaving the page, such as those on your shop and category pages. On the cart block, use Any product triggers this popup.
Exit intent doesn’t work on phones
Exit intent needs a mouse. Untick Mobile and Tablet on the exit intent popup, and use another trigger for a mobile popup.
The popup appears on the cart, checkout or My account page
The Pages context covers every WordPress page, including those. Add the pages you want under Specific pages (optional).
Country targeting shows the popup to everyone or to no one
Check that MaxMind geolocation is set up under WooCommerce » Settings » Integration » MaxMind Geolocation, and that you picked at least one country. It doesn’t work on local development sites. If your host or a caching plugin caches full pages, every visitor gets the popup chosen when the page was cached, so country, audience and schedule choices may not apply. Exclude those pages from the cache, or purge it after changes.
The popup keeps showing to everyone
Test mode is on. Turn it off in the popup editor; the popups list shows On in the Test mode column for any popup still in test mode.
Visitors see the popup again on every page
The popup only stays hidden after a visitor closes it. If they ignore it and browse on, it shows again. Use a delay, a scroll depth or an exit intent trigger to make it less frequent.
The coupon code in the template doesn’t work
The codes in the templates are samples. Create the coupon under Marketing » Coupons, and put its code in the popup.
The popups list has lots of "New popup" drafts
Add new popup creates a draft straight away, even if you leave without saving. Trash the drafts you don’t need.
Keep learning
- How to install and update WooCommerce extensions (installing, updating and fixing upload errors)
- Using sites against your activation limit (how license activations count)
- How to add custom CSS to your site (styling a popup beyond its appearance settings)