Account Funds adds a complete WooCommerce store credit system to your shop. Customers accumulate credit through purchases, rewards, refunds, or direct deposits and allows them to then spend it at checkout like any other payment method.
This guide covers the foundational concepts and helps you decide how to configure your WooCommerce store credit for your specific business model. Once you understand the core system, the feature-specific guides will make more sense.
How WooCommerce Store Credit Works
The Customer Wallet
Every customer has a wallet. A running balance of store credit they can spend. Every credit and debit is recorded as a transaction with a timestamp, amount, reason, and reference to what triggered it.
This matters for:
- Auditing and disputes (“When did I earn this? From what order?”)
- Expiring credit (credits can expire based on when they were earned)
- Tracking reward performance (which cashback rules are driving the most credit?)
Customers see their balance and transaction history in My Account → Store Credit.
How Credit Enters the Wallet
There are five ways credit gets added to a customer’s wallet:
1. Cashback rewards — Automatic credit when orders are paid or products are purchased. You define the rules; the system handles the rest.
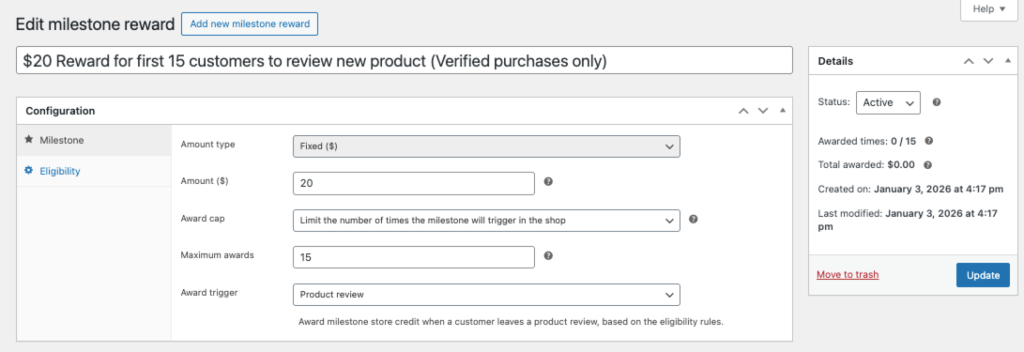
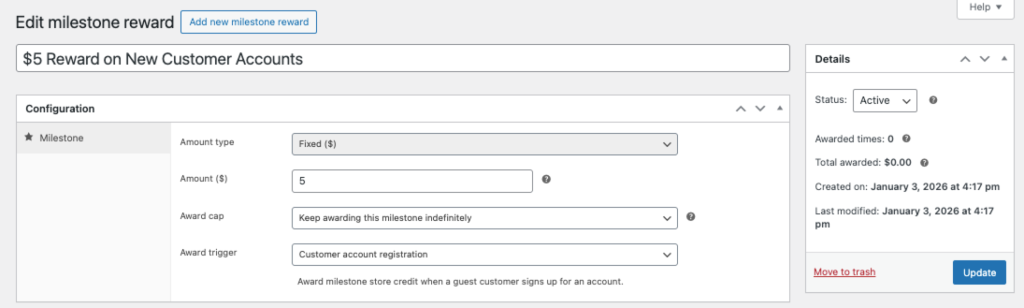
2. Milestone rewards — Automatic credit for specific actions like registering an account or leaving a product review.
3. Store credit products — Customers purchase credit directly, like buying a gift card for themselves. You create a special product type that deposits funds instead of shipping a physical item.
4. Refunds — Instead of returning money to the original payment method, credit the customer’s wallet. Faster for them, keeps revenue in your ecosystem.
5. Manual adjustment — Admins can add or remove credit from any customer’s account. Useful for customer service gestures, corrections, or bulk imports.
How Credit Leaves the Wallet
Credit is spent at checkout through the Account Funds payment gateway. Depending on your settings:
Full payment — If the customer has enough credit, they can pay the entire order with store credit. No external payment processing needed.
Partial payment — Customers apply some of their credit toward the order and pay the remainder with another method (credit card, PayPal, etc.).
Credit can also be removed via manual adjustment or automatic reversal when orders are cancelled or refunded.
Choosing Your Approach
Account Funds supports several distinct business models. You don’t have to use all features. Pick what fits your goals.
Loyalty/Rewards Program
The most common use case. Customers earn credit by shopping, which encourages repeat purchases.
What you’ll configure:
- Cashback rewards (percentage or fixed amount per order)
- Optional milestone rewards (signup bonus, review incentives)
- Partial payments enabled so customers can use credit on any order
Prepaid Store Wallet
Customers pre-load credit and spend it down over time. Popular for B2B accounts with purchasing limits or parents loading accounts for kids.
What you’ll configure:
- Store credit products for purchasing credit
- Top-up from My Account enabled
- Optional: Full payment only (no partial payments)
Refund Retention System
Use store credit primarily for refunds, keeping money in your ecosystem instead of returning it to payment processors.
What you’ll configure:
- Refund to store credit enabled
- Optional: Small cashback to sweeten the deal
- Partial payments enabled
Points/Credits System
Use store credit as an abstract currency with a custom name (“points,” “rewards,” “credits”) rather than dollar values.
What you’ll configure:
- Custom label in settings (e.g., “Reward Points”)
- Fixed-amount rewards (not percentages)
- Optional: CSS to hide currency symbols
Hybrid Approach
Most stores combine elements. A typical setup:
- 5% cashback on all orders (loyalty)
- $5 welcome bonus for new accounts (acquisition)
- $2 per product review (engagement)
- Refunds default to store credit (retention)
Initial Configuration
After activating the plugin, start with the core settings before creating rewards.

Step 1: Set Your Store Credit Label
Navigate to Store Credit → Settings → General.
The default label is “Store Credit” but you can change it to match your brand: “Rewards,” “Store Balance,” “Account Funds,” or anything else. This label appears throughout the customer experience—My Account, checkout, emails.
You can set both singular and plural forms for proper grammar in different contexts.
Step 2: Configure the Payment Gateway
Navigate to WooCommerce → Settings → Payments and find the Account Funds gateway.
Enable the gateway if you want customers to pay with their balance at checkout. Key settings:
Partial payments — When enabled, customers can apply part of their balance and pay the rest with another method. When disabled, they can only use store credit if it covers the entire order.
Gateway title and description — What customers see at checkout. Consider something like “Pay with Store Credit” with a description showing their current balance.
Step 3: Configure Display Options
Navigate to Store Credit → Settings → Display.
These settings control where customers see information about available rewards and their balance:
- Show cashback notices on product pages
- Show potential earnings in cart and checkout
- Show balance in My Account navigation
Enable what makes sense for your approach. A loyalty program benefits from prominent display; a refund-only system might keep it subtle.
Next Steps by Use Case
Setting Up Loyalty Rewards
If you want customers to earn credit from purchases:
- Read the Cashback Rewards Guide
- Create your first cashback reward (start simple—5% on all orders)
- Optionally add milestone rewards for signups or reviews
Setting Up Prepaid Wallets
If you want customers to pre-load credit:
- Read the Store Credit Products Guide
- Create deposit products at various price points ($25, $50, $100)
- Enable top-up from My Account if desired
Setting Up Refund Credits
If you want to use store credit for refunds:
- Read the Refunds to Store Credit Guide
- Train your team on the refund process
- Consider adding a small loyalty cashback to complement
Where Things Live
The plugin adds a top-level menu in WordPress admin:
Store Credit
- Dashboard — Overview of wallet balances, recent transactions, reward performance
- Transactions — Full ledger of all credits and debits across all customers
- Cashback — Create and manage cashback reward configurations
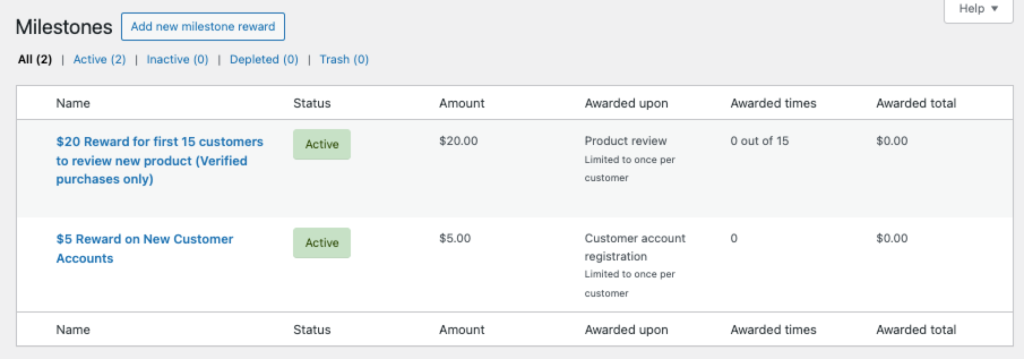
- Milestones — Create and manage milestone reward configurations
- Settings — General settings, display options, gateway configuration
Customer balances can also be viewed and edited from the user profile in Users → Edit User.
Testing Your Setup
Before going live, test the complete flow:
- Create a test customer account — Use a separate email address
- Verify milestone triggers — If you set up a signup bonus, confirm it credits immediately
- Place a test order — Use a test payment method or cash on delivery
- Verify cashback credits — Check the transaction appears when the order is paid
- Use credit at checkout — Place another order and pay with the earned credit
- Test a refund — Process a refund to store credit and verify it appears in the wallet
The Store Credit → Transactions screen shows everything happening in the system. Use it to verify your rewards are triggering correctly.
Migrating Existing Balances
If you’re switching from another store credit or points plugin, you can import existing balances:
Individual customers — Edit the user profile and set their balance directly.
Bulk import — Use a CSV import tool or direct database access. Contact support for guidance on large migrations.
The v4.0 ledger architecture means imported balances appear as “migration” transactions, maintaining full audit trail.
Common Questions
Do customers need accounts?
Yes. Store credit is tied to customer accounts. Guest checkout doesn’t support wallet balances. If you want guests to earn rewards, encourage account creation with a milestone bonus.
Can credit expire?
Yes. When configuring rewards, you can set expiration periods. Credit expires based on when it was earned, not when the reward was created. The system automatically tracks and expires credit.
What happens during refunds?
You choose. WooCommerce’s standard refund process offers a “Refund to Store Credit” option alongside refunding to the original payment method. You control which option to use on a per-refund basis.
Can I limit who sees the payment gateway?
Yes. Through WooCommerce’s standard gateway visibility controls, you can restrict by customer role or other conditions. For advanced membership-based restrictions, Account Funds integrates with Constellation.
Is there an API?
Yes. Account Funds extends the WooCommerce REST API to include customer balances and transaction data. Useful for mobile apps, integrations, or custom reporting.
Getting Help
If you run into issues or have questions about your specific use case:
- Documentation — Browse the full docs at kestrelwp.com/docs/account-funds
- Support — Open a ticket at kestrelwp.com/support
When contacting support, include your WooCommerce System Status Report (WooCommerce → Status → Get System Report) and describe what you expected vs. what happened.