


Order Tags labels your WooCommerce orders with colored tags, such as "Wholesale", "Gift" or "Express", so your team can spot, filter and sort orders at a glance. You add tags to orders by hand, in bulk from the orders list, or automatically with rules.
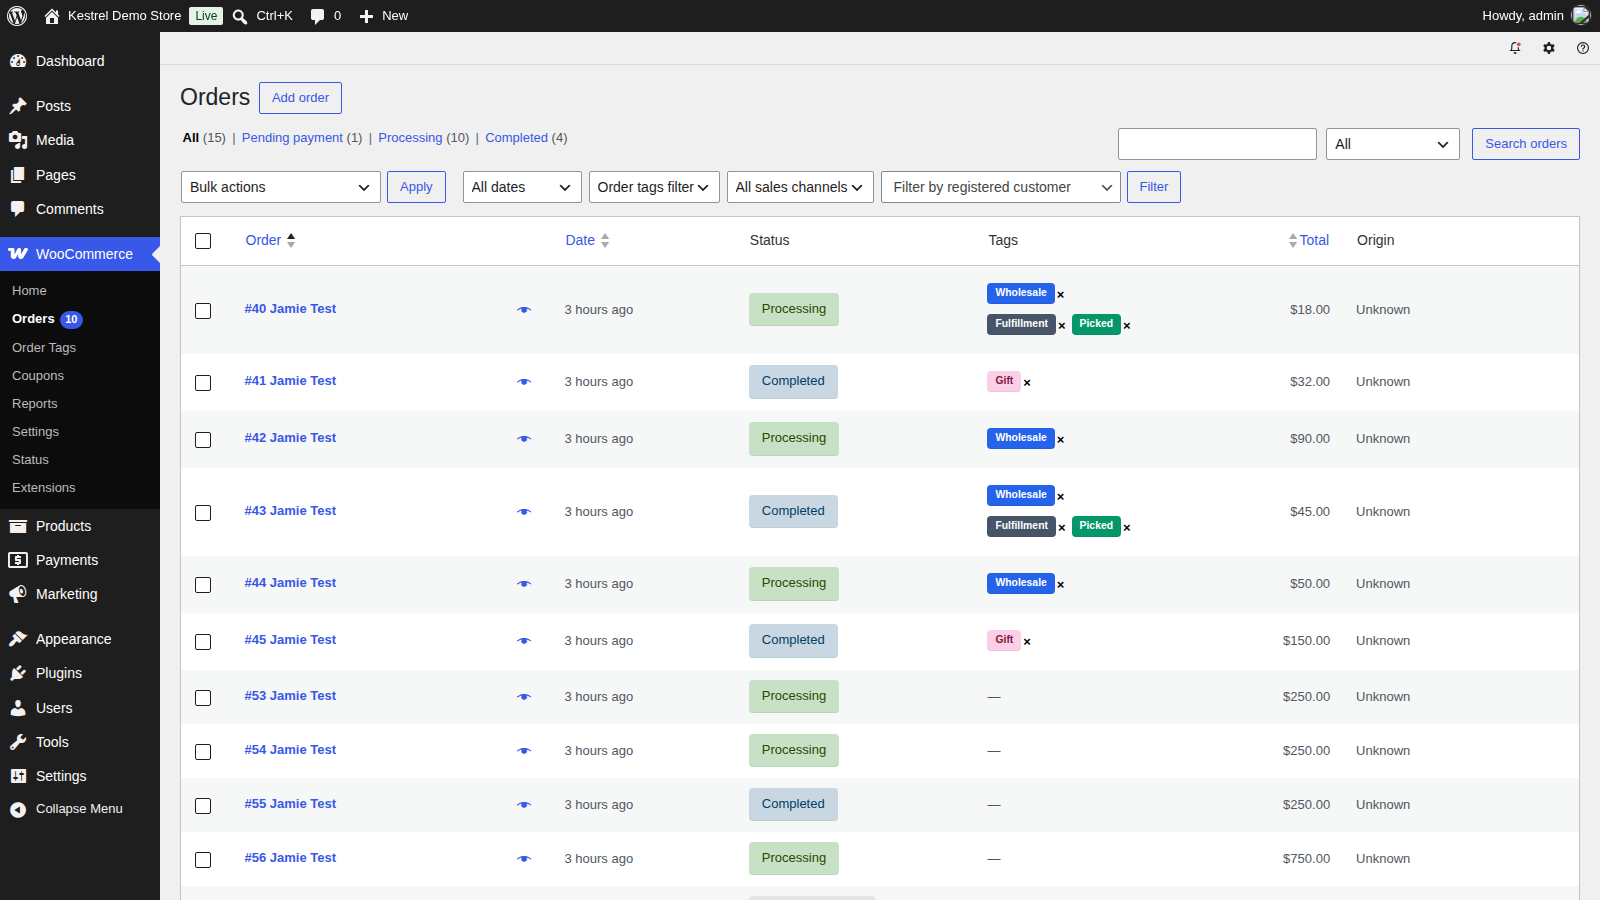
Tags are labels for you and your team. They don’t change an order’s status or send emails, and customers never see them.
When you’d use this
- Flag wholesale, gift or first-time customer orders for your packing team.
- Mark orders that used a certain coupon or shipping method.
- Separate orders that need a follow-up, such as a customer note or a high order total.
- Group tags under a parent, such as "Fulfillment" with "Picked" and "Packed" under it.
Requirements
- WordPress 6.3 or later, WooCommerce 8.5 or later, and PHP 7.4 or later.
- Compatible with WooCommerce’s cart and checkout blocks and High-Performance Order Storage.
- WooCommerce Subscriptions is optional. With it active, tags can also be set when a renewal order is created.
- Store administrators and shop managers can create and apply tags, and use the bulk page under Tag existing orders.
Install and activate
How you get updates depends on where you bought Order Tags:
- Bought on kestrelwp.com: download the plugin from the Licensed downloads tab of your kestrelwp.com account and install it. Then go to Settings » Order Tags for WooCommerce activation and activate the key from your License keys tab to receive updates. See using sites against your activation limit for how activations count.
- Bought on WooCommerce.com: install the plugin from your WooCommerce.com account. Updates come through your WooCommerce.com connection, with no license key to enter.
For upload, FTP and update steps, follow how to install and update WooCommerce extensions.
Once it’s active, WooCommerce has a new Order Tags menu item, and your orders list has a Tags column.
Set up your first tag
1. Create the tag
Go to WooCommerce » Order Tags. In the Add new order tag form, enter a Name, optionally pick a Parent order tag and add a Description, then click Add new order tag.

2. Set its colors
Once the tag is added, its edit screen opens. Colors and rules are only on this edit screen, not the add form. To come back to it later, click the tag’s name in the list. Set Color background and Color text, or leave them empty for white text on black.
3. Add a rule, if you want it set automatically
Under Set on, tick when the rule runs, such as Order placed. Under Set if, tick what the order must match, such as Order total with >= and 100. Leave "Set if" mode on All. Order Tags automatic tagging rules covers every option.

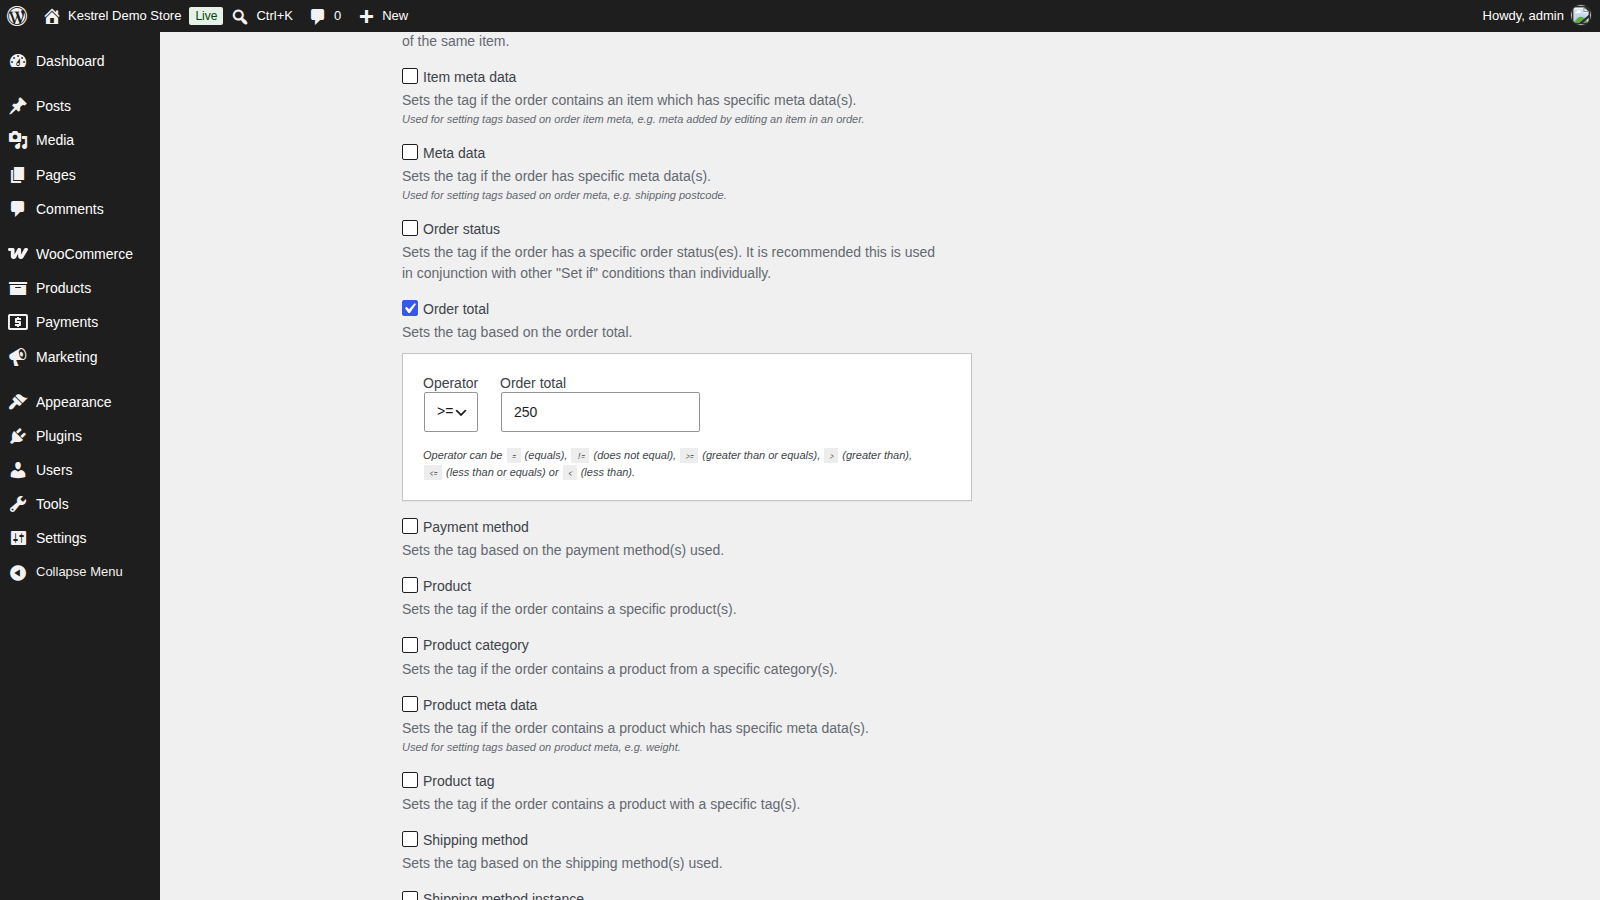
Skip this step for a tag you’ll only add by hand.
4. Update and check it
Click Update. If the tag has no Set on or no Set if option ticked, a prompt warns that it won’t be set automatically; click OK if it’s a tag for manual use.
Place a test order that matches the rule, then go to WooCommerce » Orders: the tag shows in the order’s Tags column. Rules apply to orders placed or updated from now on. To tag orders you already have, see Tag existing orders.
Tag settings
Every tag has these settings on its edit screen. Rules are covered in Order Tags automatic tagging rules.
Name
The label shown on orders.
Unique reference
The tag’s slug, labeled Slug on the add form. WordPress fills it in from the name. It’s what the tag is called in the order data that exports and other integrations read, so change it only if an integration needs a specific value.
Parent order tag
Makes the tag a child of another tag. See Parent and child tags.
Description
Shown when you hover over the tag on an order. Use it to tell your team what the tag means or what to do.
Color background
The tag’s background color. Empty means black (#000000).
Color text
The tag’s text color. Empty means white (#ffffff).
Tag orders by hand
On the order screen
Open an order and tick the tags you want in the Order tags box, then click Update. Tags show under the order’s details, at the top of the screen. To create a tag without leaving the order, click + Add new order tag in the box; it gets the default colors and no rule until you edit it under WooCommerce » Order Tags.
To remove a tag, click the × next to it, under the order’s details or in the orders list. It’s removed straight away, without saving the order.

From the orders list
Tick the orders, choose Set order tag: [tag] or Remove order tag: [tag] from Bulk actions, and click Apply. A notice confirms how many orders changed, such as "3 order tags set."
If a tag has a rule that runs on Order update, it can come back the next time the order is updated while the order still matches. See A tag comes back after I remove it.
Find tagged orders
The Tags column in WooCommerce » Orders shows each order’s tags. To list only the orders with a certain tag, pick it in the Order tags filter dropdown above the list and click Filter. Pick None to list orders with no tags at all.

Filtering by a tag lists orders that have that exact tag. Filtering by a parent tag doesn’t include orders that only have one of its child tags.
Parent and child tags
Pick a Parent order tag to group related tags, such as "Picked" and "Packed" under "Fulfillment". Parents and children are separate tags: setting a child on an order doesn’t add its parent.
On orders, a parent and its children show together on a line of their own, after any tags that have no children. In the Bulk actions and Order tags filter dropdowns, child tags are indented under their parent with a dash.
Tag existing orders
Rules run when orders are placed, updated or renewed, so orders from before you added a rule aren’t tagged. The bulk page applies or clears tags across every order in your store at once. It has no menu item: as an administrator or shop manager, open /wp-admin/admin.php?page=wcot-order-tags-set-tags-bulk on your site.
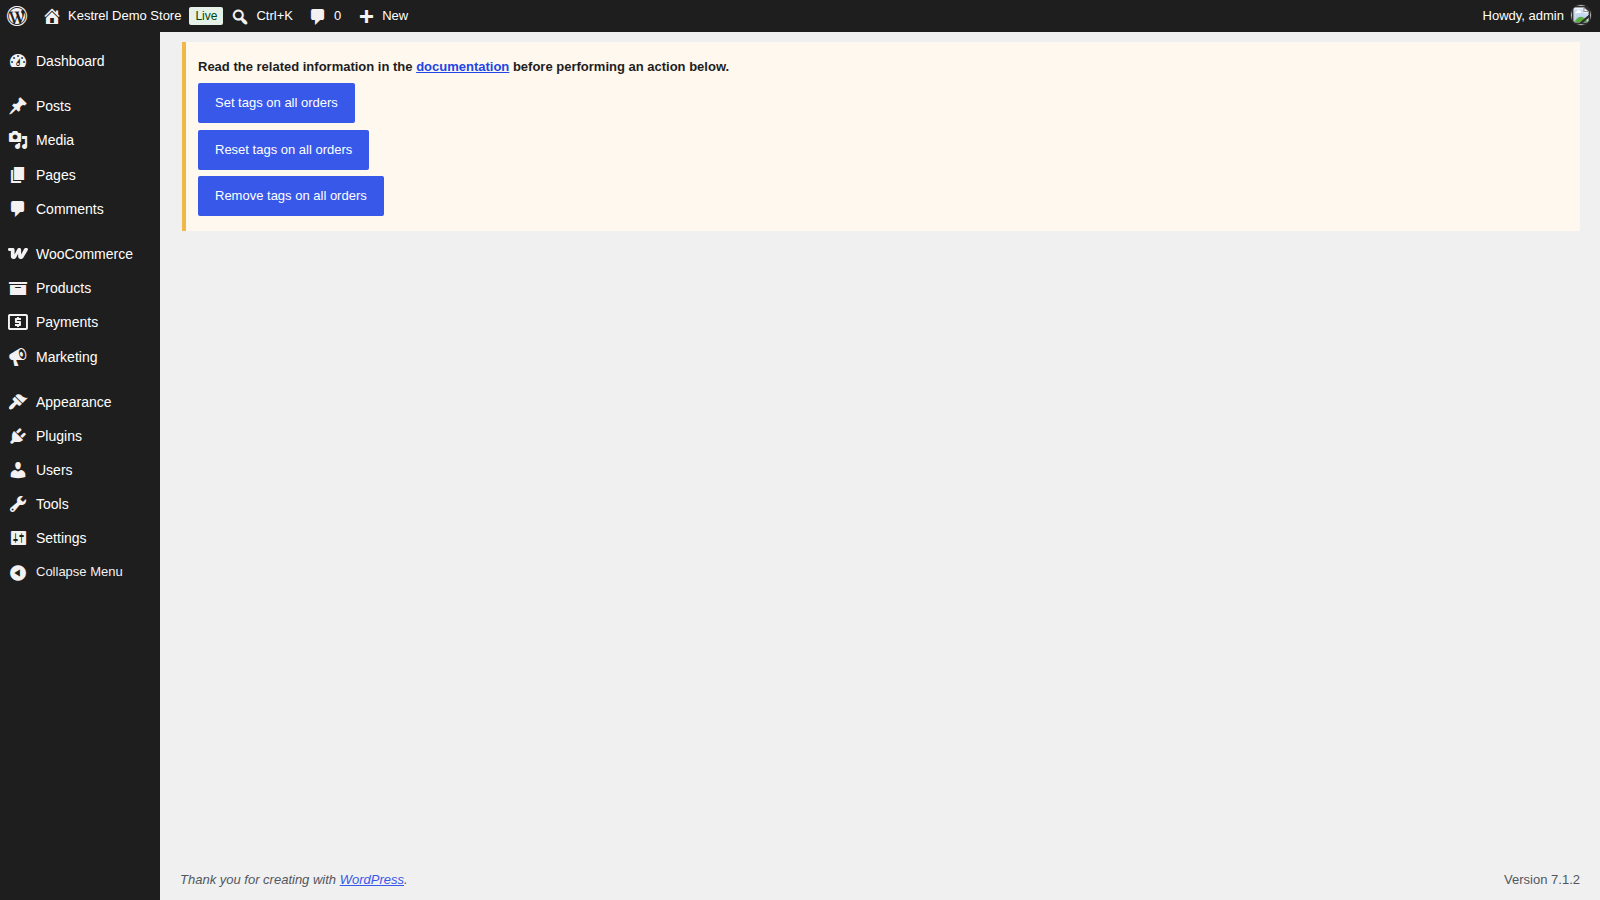
- Set tags on all orders: checks every order against every tag’s Set if conditions and adds the tags that match. It ignores Set on, so every tag with conditions counts. Tags already on orders stay.
- Reset tags on all orders: removes every tag from every order, including tags you added by hand, then runs Set tags on all orders.
- Remove tags on all orders: removes every tag from every order.
Each button asks "Are you sure?" first, and the page shows "Order tags on all orders have been bulk updated." when it’s done. Before you use it:
- Back up your site. These actions change every order and can’t be undone.
- Try it on a staging site first. Every order is processed in one go, so on a store with many orders it can take a long time or time out.
Common issues
A tag isn’t set automatically
Check these in order:
- The tag has at least one Set on option and at least one Set if condition ticked.
- With "Set if" mode on All, the order meets every ticked condition.
- Set tag exclusions doesn’t match the order.
- The order was placed or updated after you added the rule. For older orders, use Tag existing orders.
- Customer and Customer role never match guest orders.
Order Tags automatic tagging rules covers rule-specific problems, such as checkout block orders and meta data conditions.
A tag comes back after I remove it
The tag has a rule that runs on Order update, and the order still matches it, so the next update sets it again. Untick Order update on that tag if you don’t want this, or change its conditions.
A tag stays on an order that no longer matches
Rules only add tags; they never remove one when an order stops matching. Remove the tag by hand, or use Reset tags on all orders to start over.
A bulk action says "No order tags set."
The tag’s Set tag exclusions match the selected orders, which stops the tag even when you set it by hand. Check the exclusions on the tag’s edit screen.
Filtering by a parent tag misses orders
The filter matches the exact tag only. Filter by the child tag, or add the parent tag to those orders too.
The bulk page times out
The bulk page processes every order in one request. Ask your host about raising PHP’s execution time limit, or set tags on smaller batches of orders with the orders list’s bulk actions instead.
Keep learning
- Order Tags automatic tagging rules (every Set on and Set if option, with examples)
- Order Tags developer reference (filters, functions and exporting tags)
- How to install and update WooCommerce extensions (installing, updating and fixing upload errors)
- Changing text in a plugin (translating or renaming the plugin’s labels)