


Product Badges puts badges on your product images: sale and "New" labels, stock alerts, seasonal artwork, countdown timers, brand logos or your own HTML. Each badge decides which products it appears on, where on the image it sits, and whether it shows on product pages, in product listings or both.

Badges decorate product images only. They don’t appear in the cart or at checkout, and a badge shows whenever its conditions match, with no start or end date.
When you’d use this
- Replace WooCommerce’s "Sale!" flash with your own sale badge, or show the discount as a percentage.
- Flag low stock, backorders or out of stock products.
- Run a countdown to the end of a flash sale.
- Mark featured products, a brand or a shipping class with its own badge.
- Add seasonal artwork for Black Friday, Christmas or Halloween.
Requirements
- WordPress 6.3 or later, WooCommerce 8.5 or later, and PHP 7.4 or later.
- Compatible with WooCommerce’s cart and checkout blocks and High-Performance Order Storage.
- Your theme displays product images through WooCommerce’s standard product image hooks, or you set one of the compatibility settings.
- Store administrators and shop managers can manage badges and the settings.
Install and activate
How you get updates depends on where you bought Product Badges:
- Bought on kestrelwp.com: download the plugin from the Licensed downloads tab of your kestrelwp.com account and install it. Then go to Settings » Product Badges for WooCommerce activation and activate the key from your License keys tab to receive updates. See using sites against your activation limit for how activations count.
- Bought on WooCommerce.com: install the plugin from your WooCommerce.com account. Updates come through your WooCommerce.com connection, with no license key to enter.
For upload, FTP and update steps, follow how to install and update WooCommerce extensions.
Create your first badge
1. Add a badge
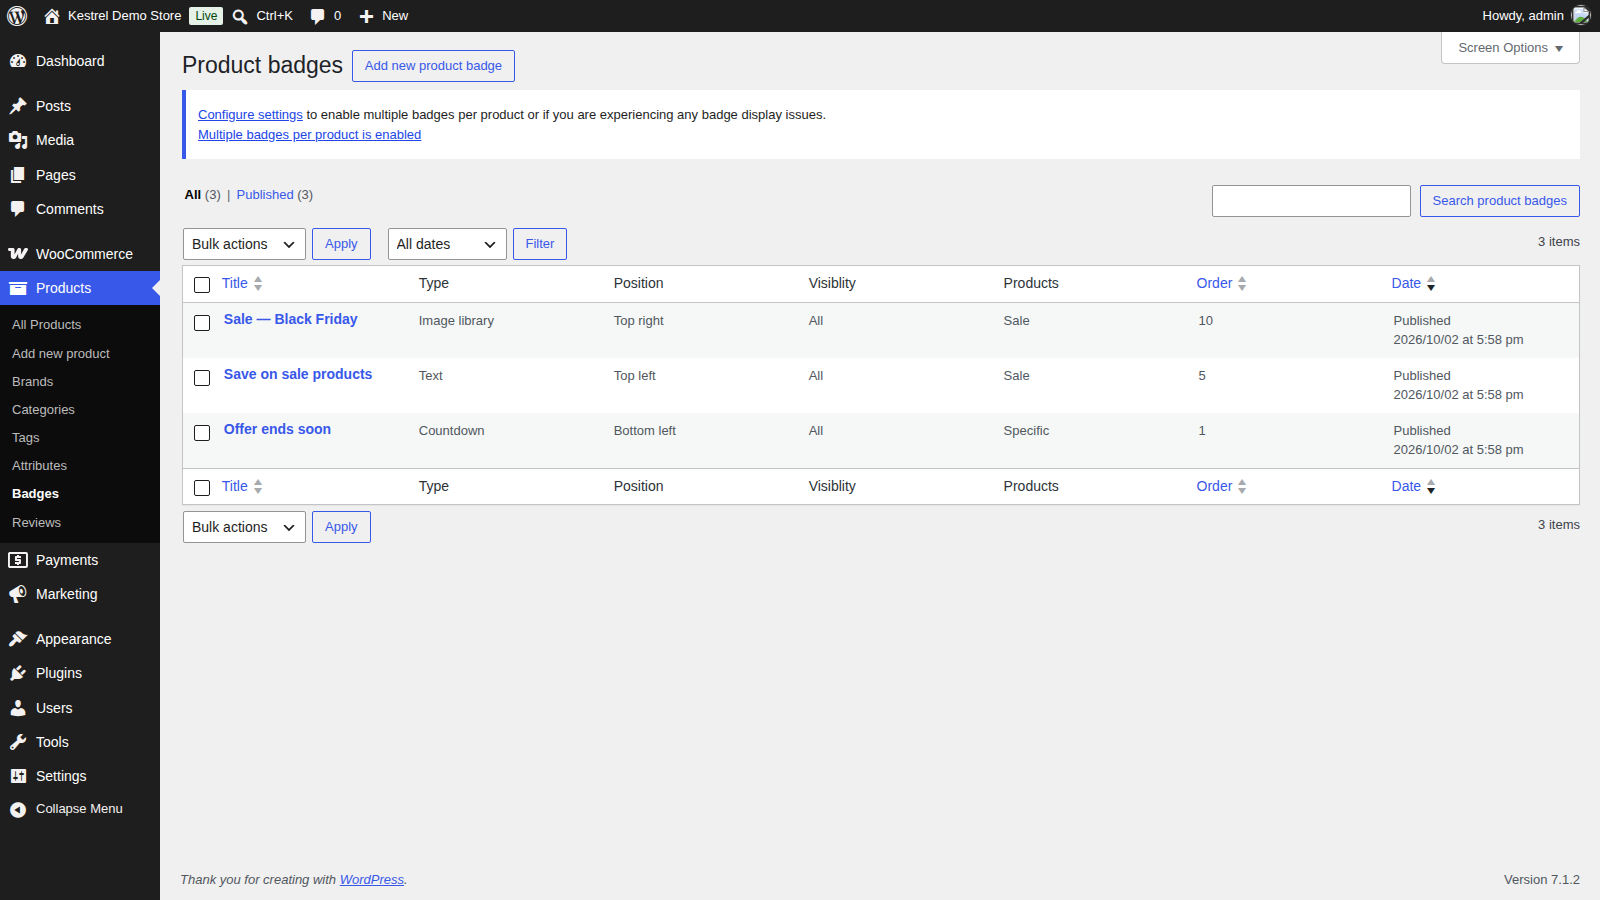
Go to Products » Badges and click Add new product badge. Give the badge a title you’ll recognize in the badge list and on product edit screens; shoppers never see it.
2. Choose where it shows and on which products
In the Display box, leave Visibility at All to show the badge on product pages and in listings. Under Products, choose which products get it. For a sale badge, choose Sale. For hand-picked products, leave Specific and search for products, categories, tags or shipping classes.
3. Design the badge
In the Badge box, pick a Type. For a quick start, leave Image library, narrow the library with its Type and Color filters, and click a badge. Then set its Position on the image, its Offset from the edge and its Width.

4. Set its priority
If more than one badge can match the same product, set an Order number in the Attributes box. The highest number wins (see how Product Badges chooses which badge to show).
5. Publish and check it
Click Publish, then open your shop page and a matching product in a private browser window. Product Badges clears the WP Rocket, W3 Total Cache, WP Super Cache and LiteSpeed Cache page caches when you save a published badge; clear any other page cache yourself first.
How Product Badges chooses which badge to show
Each time a product image appears, Product Badges checks your published badges from the highest Order number to the lowest. A badge matches when its Visibility covers where the image is (a product page or a listing) and its Products option covers the product.
By default, the first match is the only badge the product shows. Turn on Multiple badges per product to show every matching badge instead; Order then only decides which badge sits on top where badges overlap, with lower numbers on top. Badges with the same Order number have no set order, so give each badge its own number.
A badge that matches but has nothing to display is skipped, and the next matching badge shows instead. That happens with a countdown badge after its date, a countdown with no Countdown to date, an image badge with no image chosen, and a text or code badge left empty.
Display box
Visibility
- All (the default): product pages and product listings.
- Product pages: single product pages only.
- Product loops: listings only, such as the shop, category and search pages, related products and WooCommerce product blocks.
Products
Which products get the badge. Only one option applies per badge.
- Specific (the default): the products, categories, tags and shipping classes you pick in the fields that appear. A product matches if it’s picked directly, or has one of the picked tags or shipping classes, or is assigned directly to one of the picked categories. A product only in a subcategory doesn’t match its parent category.
- All: every product.
- Sale and Non-sale: products on sale, or not on sale.
- Out of stock and On backorder: products with that stock status.
- Low stock: products that manage stock and have a quantity above zero but at or below their Low stock threshold. A product without its own threshold uses the store’s, under WooCommerce » Settings » Products » Inventory.
- Featured: products marked as featured.
- Custom rules: products chosen by code your developer adds. Choosing it shows the instructions and an example in the editor.
To combine conditions, such as a category and a price range, use Custom rules.
Badge box
- Type: what the badge is made of.
- Image library (the default): one of 143 ready-made badges. The Type filter narrows them by theme (Availability, General, Black friday, Christmas and other seasons) and Color by color.
- Image custom: your own image, chosen in the Badge image custom box on the right of the editor.
- Countdown: a live timer to a date and time.
- Text: a text label, with placeholders for prices and stock.
- Code: your own HTML.
- Position: Top left, Top right (the default), Bottom left or Bottom right of the product image.
- Offset: the distance in pixels from the edge of the image. Default 10; 0 puts the badge at the edge.
- Width: the badge width in pixels, under Size. Default 120. The height follows the badge’s proportions, and 0 fits the badge to its content, which suits countdown and text badges. The same width applies on every screen size; the responsive breakpoints link beside the field shows how to change it per screen size with custom CSS.
- Animation: None (the default), or Bounce, Breathing, Jiggle, Rotate, Shadow Pulse, Shake, Sway, Tilt or Wave.
- Duration (milliseconds): how long one cycle of the animation takes, from 500 to 5000. Default 1000.
- Countdown to: for Countdown badges, the date and time the timer counts down to, in your store’s time zone (set under Settings » General), so it ends at the same moment for every visitor. The badge shows the days, hours, minutes and seconds left, between your Text before and Text after. When the time is up, the timer disappears.
- Text: for Text badges, the label. For example,
Save [discount_percentage]shows "Save 20%" on a product with a 20 percent discount. These placeholders fill in product details:[price]: the price as your shop shows it, including price ranges.[regular_price]: the regular price. On a variable product, the range across its variations.[sale_price]: the sale price, only while the product is on sale. On a variable product, the range across the variations on sale.[stock]: the stock quantity, or "In stock", "Out of stock" or "On backorder" when the product doesn’t manage stock.[discount_percentage]: the discount, such as 20%, only while the product is on sale. On a variable product, the largest discount across its variations.
- Code: for Code badges, your own HTML. Product Badges removes tags WordPress doesn’t allow in post content, such as
<script>and<style>, so style the badge with inlinestyleattributes or custom CSS. Wrap the content in a block element such as a<div>so it fits the badge width.
Countdown and text styling
Countdown and text badges share these fields:
| Field | What it sets | Default |
|---|---|---|
| Text align | Center, Left or Right | Center |
| Text color and Background color | Colors of the text and the badge | Your theme’s |
| Font size | Size in pixels | 12 |
| Font style | Normal or Italic | Normal |
| Font weight | Normal or Bold | Normal |
| Padding top, Padding right, Padding bottom, Padding left | Space inside the badge, in pixels | 0 |
| Border radius top left, Border radius top right, Border radius bottom left, Border radius bottom right | Corner rounding, in pixels | 0 |
Assign badges from the product edit screen
The product edit screen has a Badges box in its sidebar. It lists your published badges whose Products option is Specific. Selecting one adds the product to that badge; removing it takes the product off. When Multiple badges per product is off, the box reminds you that only one badge will show.
Product Badges settings
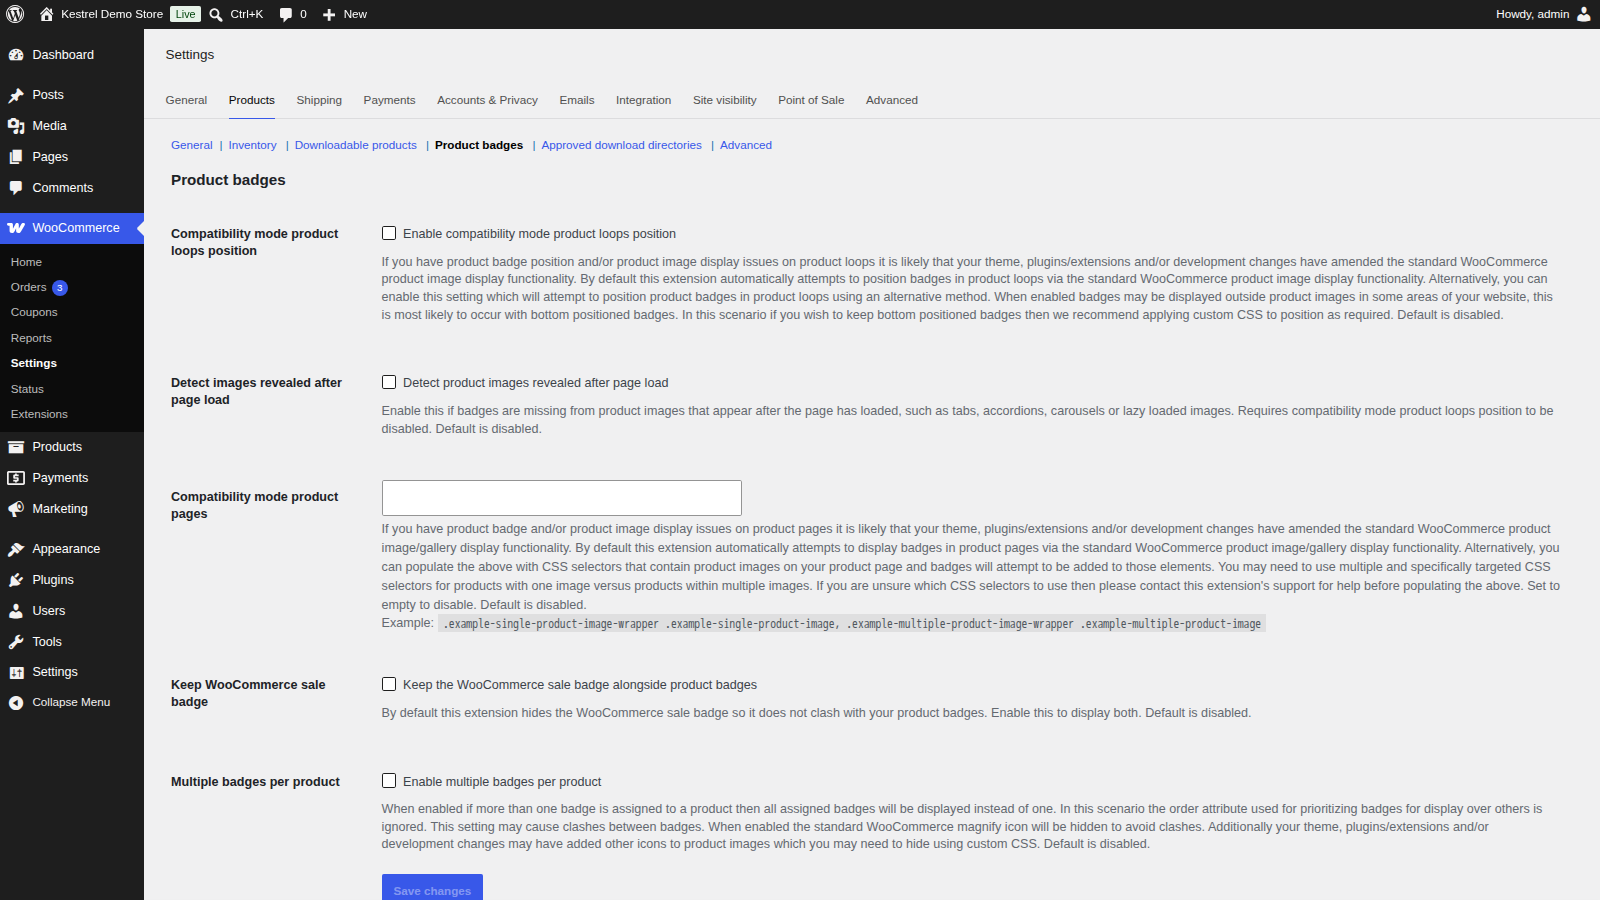
Go to WooCommerce » Settings » Products » Product badges. The badge screens show a notice linking here, with a line for each compatibility or multiple badges setting you’ve turned on.
Product loops compatibility mode
Places badges in product listings by a different method, for themes or plugins that change WooCommerce’s standard listing image. Off by default. With it on, bottom positioned badges can land outside the image in some places; adjust them with custom CSS or use a top position.
Detect images revealed after page load
Adds badges to listing images that appear after the page loads, such as in tabs, accordions, carousels and lazy loaded images. Off by default. It has no effect while Product loops compatibility mode is on.
Product pages compatibility mode
CSS selectors for the elements that hold the product images on single product pages, for themes or plugins that replace WooCommerce’s product gallery. Empty (off) by default. When set, badges go into those elements instead. Products with one image and with a gallery may need different selectors, separated by commas. If you’re unsure which selectors to use, contact support before filling it in.
Keep WooCommerce sale badge
Product Badges hides WooCommerce’s own "Sale!" flash so it doesn’t overlap your badges. Turn this on to show both on shop, category and product pages. WooCommerce’s product grid blocks still hide their sale flash. Off by default. To replace the flash instead, create a badge with Products set to Sale.
Multiple badges per product
Shows every badge that matches a product instead of only the highest priority one. Off by default. Badges in the same position can overlap, so give them different positions. With it on, WooCommerce’s gallery zoom (magnify) icon is hidden to avoid clashing with badges.
What customers see
Badges sit over the product image, in listings and on product pages. On a product page with a gallery, the badge appears on each gallery image. Countdown badges tick down live, and animated badges move on a loop.
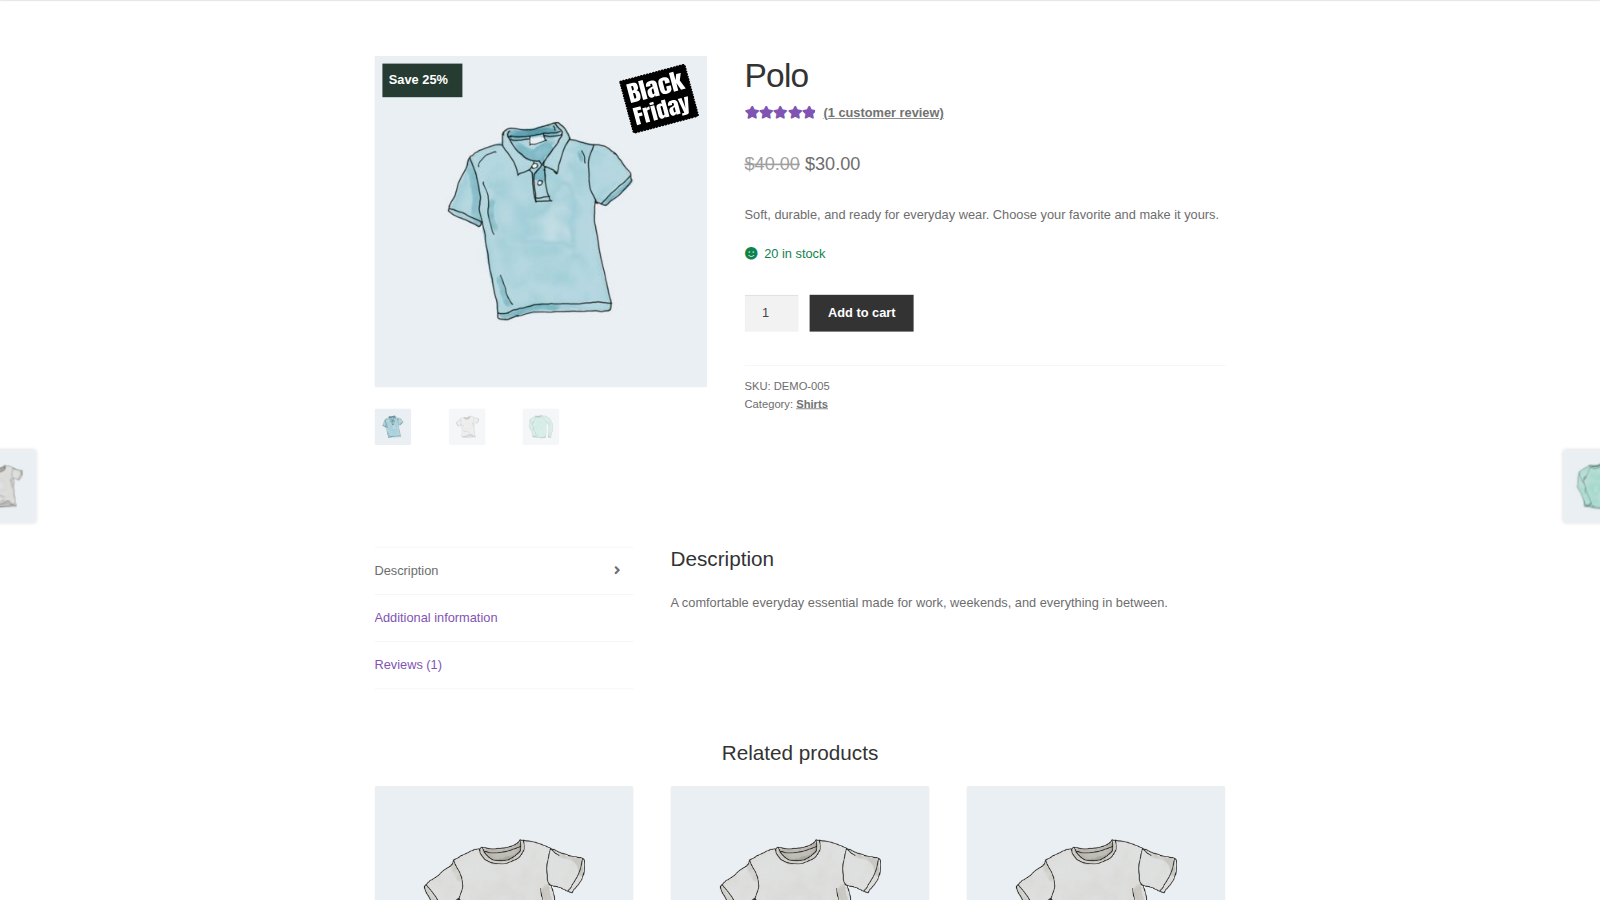
Every badge has the CSS class wcpb-product-badges-badge, plus wcpb-product-badges-badge- followed by its ID (the number after post= in the badge’s edit URL), for styling with custom CSS.
Common issues
A badge doesn’t show
Work through these in order:
- The badge is published, not a draft.
- Its Products option matches the product. A Specific badge with nothing picked matches no products, and categories match only when assigned directly to the product.
- Its Visibility covers where you’re looking: a product page or a listing.
- No badge with a higher Order matches the same product, unless Multiple badges per product is on.
- The badge has content: an image chosen, a Countdown to date in the future, or text.
- Your page cache isn’t serving an older copy. Product Badges clears the WP Rocket, W3 Total Cache, WP Super Cache and LiteSpeed Cache page caches when you save a published badge; clear any other cache, such as your host’s, after changing badges.
Badges don’t appear anywhere, or only on some pages
Product Badges adds badges through WooCommerce’s standard product image hooks. A theme, page builder or plugin that draws product images its own way may skip them. Try Product loops compatibility mode for listings and Product pages compatibility mode for product pages. If badges still don’t appear, ask the theme or builder’s developer whether their product templates use WooCommerce’s standard image hooks.
Badges sit in the wrong place in listings
Turn on Product loops compatibility mode. With it on, bottom positioned badges can land outside the image in some places; adjust them with custom CSS or use a top position.
Badges are missing from products in tabs, carousels or lazy loaded grids
Turn on Detect images revealed after page load, and make sure Product loops compatibility mode is off.
The WooCommerce "Sale!" flash disappeared
Product Badges hides it by default. Create a badge with Products set to Sale, or turn on Keep WooCommerce sale badge (WooCommerce’s product grid blocks still hide their sale flash). If a sale flash still shows with the setting off, your theme draws it itself, for example with WooCommerce’s Product Sale Badge block in a block theme’s templates; remove it from your theme’s product templates.
The gallery zoom icon disappeared
Multiple badges per product hides it so it doesn’t clash with badges. Turn the setting off to bring it back.
The Low stock badge doesn’t show
The product must manage stock, have a quantity above zero, and be at or below its Low stock threshold (or the store’s). If stock is managed only on each variation, the badge checks the main product’s stock, which isn’t managed, so it doesn’t match.
A code badge lost its styling
<style> tags are removed when the badge is displayed. Use inline style attributes, or add the CSS to your theme with custom CSS.
Keep learning
- How to install and update WooCommerce extensions (installing and updating)
- Using sites against your activation limit (how license activations count)
- How to add custom CSS to your site (styling badges beyond their settings)