


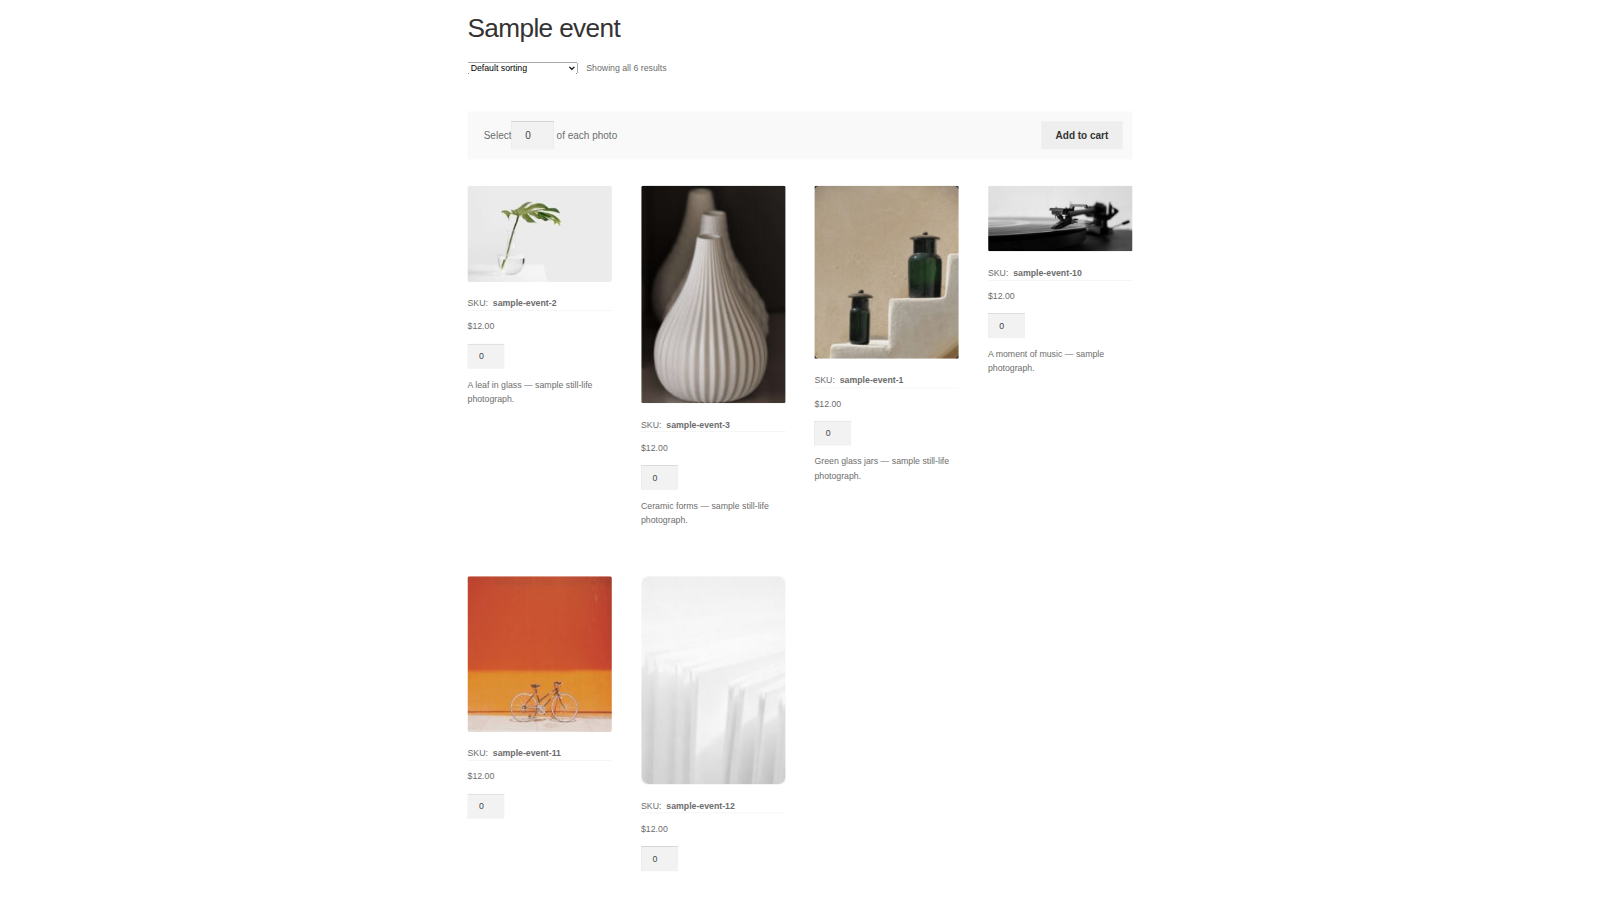
Photography for WooCommerce turns your photos into products you can sell as prints. You upload a batch of photos into a collection, and each photo becomes its own product. Then you choose who can see the collection: only the customers you give access to, or anyone with the link. Customers open the collection from their account, set how many prints they want of each photo, and add them all to the cart at once.
Photos are sold as physical products. The plugin doesn’t sell digital downloads, add watermarks, or create a page that lists all your collections.
When you’d use this
- Share each client’s photos from a wedding, event or school shoot in a private gallery they order prints from.
- Let a client share their gallery with family and friends by link.
- Sell prints from a public collection that appears in your shop.
- Offer print sizes, frames or mounting as options on every photo in a collection.
Requirements
- WordPress 6.3 or later, WooCommerce 8.0 or later, and PHP 7.4 or later.
- Compatible with High-Performance Order Storage. The plugin doesn’t declare compatibility with WooCommerce’s cart and checkout blocks.
- Administrators and shop managers can upload photos and manage collections. Saving the Photography settings needs an administrator account.
- Optional: WooCommerce Product Add-Ons, to offer options on photos.
If a requirement isn’t met, the plugin does nothing and shows a notice such as "Photography for WooCommerce requires WooCommerce to be activated to work."
Install and activate
- Bought on kestrelwp.com: install the plugin by following how to install and update WooCommerce extensions.
- Bought on WooCommerce.com: install the plugin from your WooCommerce.com account. Updates come through your WooCommerce.com connection, with no license key to enter.
Once it’s active, your admin menu has a Photography menu with Collections, Add Photographs and Settings.
How collections control who sees photos
Every photo belongs to one or more collections, and each collection is Restricted or Public:
- Restricted: only customers you’ve given access to can open the collection and its photos, and buy them. They log in to see it.
- Public: anyone with the collection’s link can open it and buy from it.
A visitor who opens a collection or photo they can’t see is sent to your My account page, where they can log in. Administrators and shop managers see every collection, so check what customers see from a private browser window or a test customer account.
Photos don’t appear in your shop, category pages or search results unless you turn on Shop Page Visbility. Even then, only photos in public collections appear there.
Set up Photography
1. Check the settings
Go to Photography » Settings. Set Collections Default Visibility to the visibility most of your collections need, and choose whether product titles use the image ID or the file name in Image Text Option. Click Save Changes. See Photography settings for every option.
2. Create a collection
Go to Photography » Collections. Enter a Name, set Visibility, and optionally add a Description and a Thumbnail, which customers see next to the collection in their account. Click Add New Photography Collection.

You can also create a collection while you upload or while you edit a customer: click + Add Collection, type the name and click Add New Collection. A collection made this way gets your Collections Default Visibility and no thumbnail; edit it under Photography » Collections to change either.
3. Upload your photos
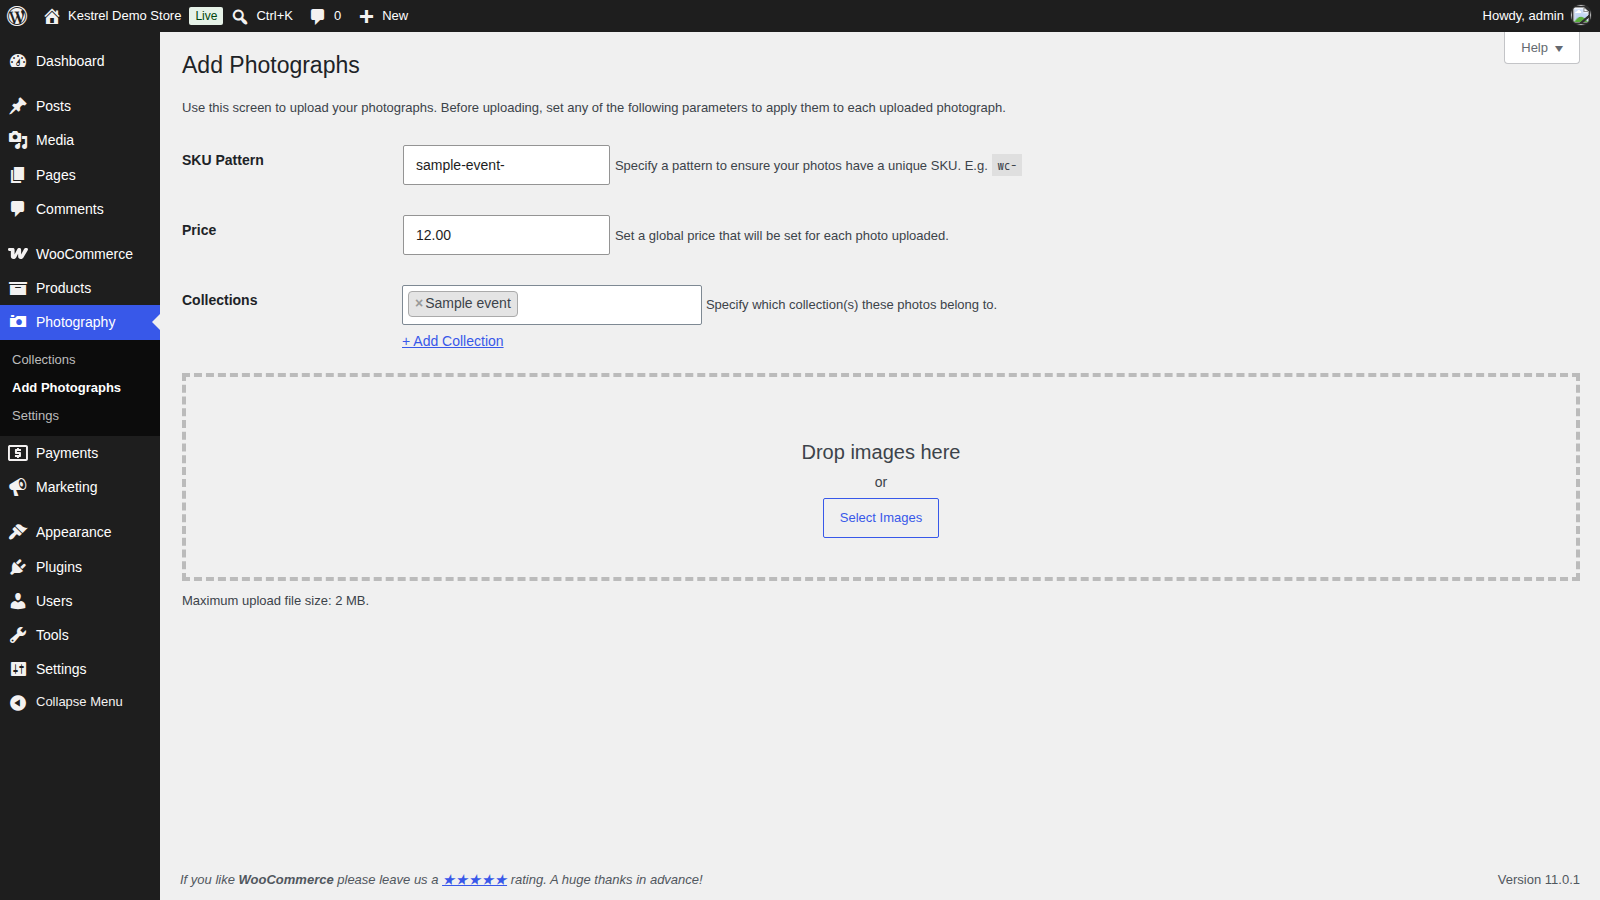
Go to Photography » Add Photographs. Before you add any images, fill in what applies to the whole batch:
- SKU Pattern: a prefix such as
wedding-smith-. Each photo gets the prefix plus a number, counting on from the last SKU created with that prefix. - Price: the regular price for every photo in the batch.
- Collections: the collection or collections the photos go into.
Then drop your images on the page or click Select Images. The uploader takes JPEG, GIF and PNG files up to the size shown under the drop area ("Maximum upload file size").
Each photo is published as a product as soon as its upload finishes. Its title is the title saved in the image file, if it has one, or otherwise "Photography #" with the image ID (or the file name) and the first collection’s name, such as "Photography #482 from Smith wedding". Photos also go into your store’s default product category.
4. Review the batch
When the uploads finish, a list of the new photos appears. Open a photo to change its SKU, Price, Collections or Caption (shown under the photo in the collection), then click Save Changes to save every change in the list. "Photographs edited successfully!" confirms it.
Remove permanently deletes that photo’s product and image.

5. Give customers access
Go to Users and edit the customer, or click Add New to create one. In Collections, pick the collections they can see, and click Update User (or Add New User).
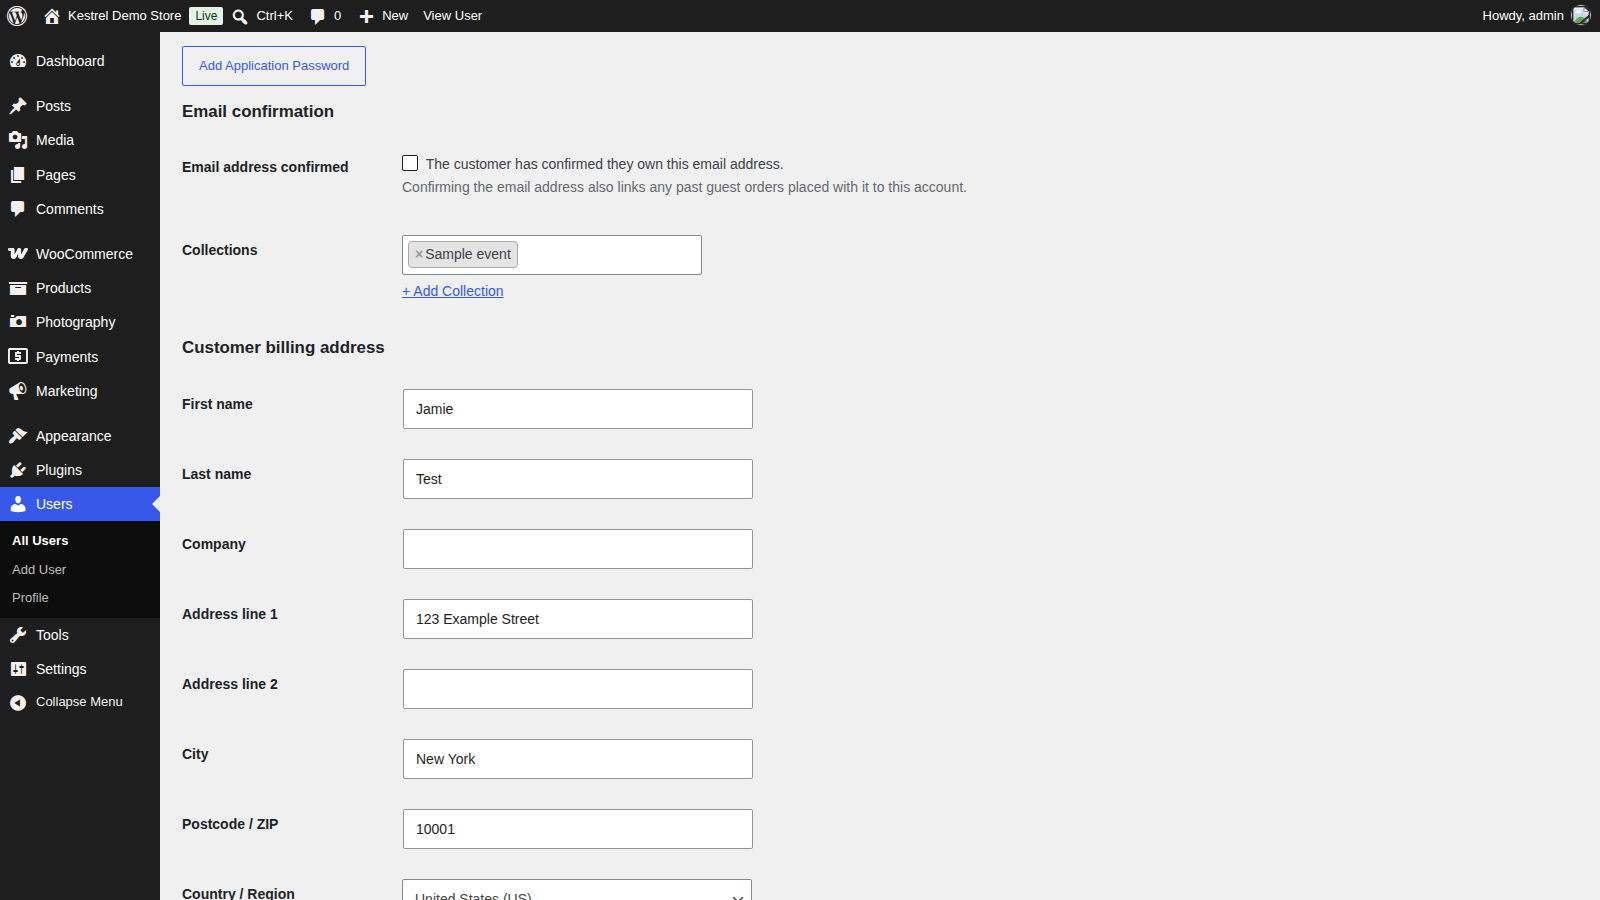
The customer gets the New Photography Collection email, with links to the newly added collections and to their account. To take access away, remove the collection from the field and update the user.
Public collections don’t need this step to be seen, but a customer only finds a collection in their account when it’s added to their profile.
6. Check it as the customer
Log in as the customer in a private browser window and open My account. The collection is listed under My Collections. Click View Photographs, set a quantity for a photo, and click Add to cart.
Upload settings and the review list
Add one photo
To add a single photo, upload it on Add Photographs, or create a product under Products » Add New, choose Photograph as the product type, and set its price and product image. Create the collection first under Photography » Collections (or with + Add Collection) so it has a visibility, then tick it in the Photography Collections box.
Use the Photograph type for collection photos. A simple product in a collection shows on the collection page, but its own product page and shop listing aren’t limited by the collection’s visibility.
Edit photos later
Photos are WooCommerce products, so edit them under Products. The View Products button next to each collection on Photography » Collections lists that collection’s photos.
Large batches
Each image goes up separately, so the limit that matters is the maximum upload file size for one image, which your host sets. If uploads fail or time out, ask your host to raise PHP’s upload size and memory limits, or upload in smaller batches.
Collection settings
A collection’s address is /collection/<slug>/ on your site. View Collection next to each collection on Photography » Collections opens it.
Edit a collection under Photography » Collections. Next to the usual name, slug, parent and description, each collection has:
Visibility
Restricted (only customers given access) or Public (anyone with the link). New collections start with your Collections Default Visibility.
Thumbnail
The cover image customers see next to the collection under My Collections. Click Upload/Add image to choose one, or Remove image to go back to the placeholder.
Parent collections
A collection can have a parent, like a product category. Keep each client’s photos in their own top-level collection.
Photography settings
Go to Photography » Settings. Saving the settings needs an administrator account.

Image Text Option
What goes into the title of photos you upload, when the image file has no title of its own: Image ID (the default, as in "Photography #482 from Smith wedding") or Filename (as in "Photography IMG_0042 from Smith wedding"). Titles of photos already uploaded don’t change.
Collections Default Visibility
The visibility new collections start with: Restricted (the default) or Public. It applies to collections created on the Collections screen and with + Add Collection.
Shop Page Visbility
"Allow public collections to show up on shop/archive pages." Off by default, which keeps every photo out of your shop, category pages and search results. Turn it on to list the photos in public collections there, as ordinary products. Photos in restricted collections stay out either way.
Collections Thumbnail size
The size of each photo on a collection page, in pixels. Default 200 × 200. Tick Hard Crop? to crop photos to exactly that size instead of scaling them to fit.
Collections Lightbox size
The size of the larger version that opens when a customer clicks a photo. Default 600 × 600, with Hard Crop? off.
New sizes apply to photos you upload afterward. To resize photos you’ve already uploaded, regenerate their thumbnails with a plugin such as Regenerate Thumbnails.
What customers see
In their account
The My account dashboard shows a My Collections table with each collection they have access to: its cover image, title, number of photos and visibility, and a View Photographs button.
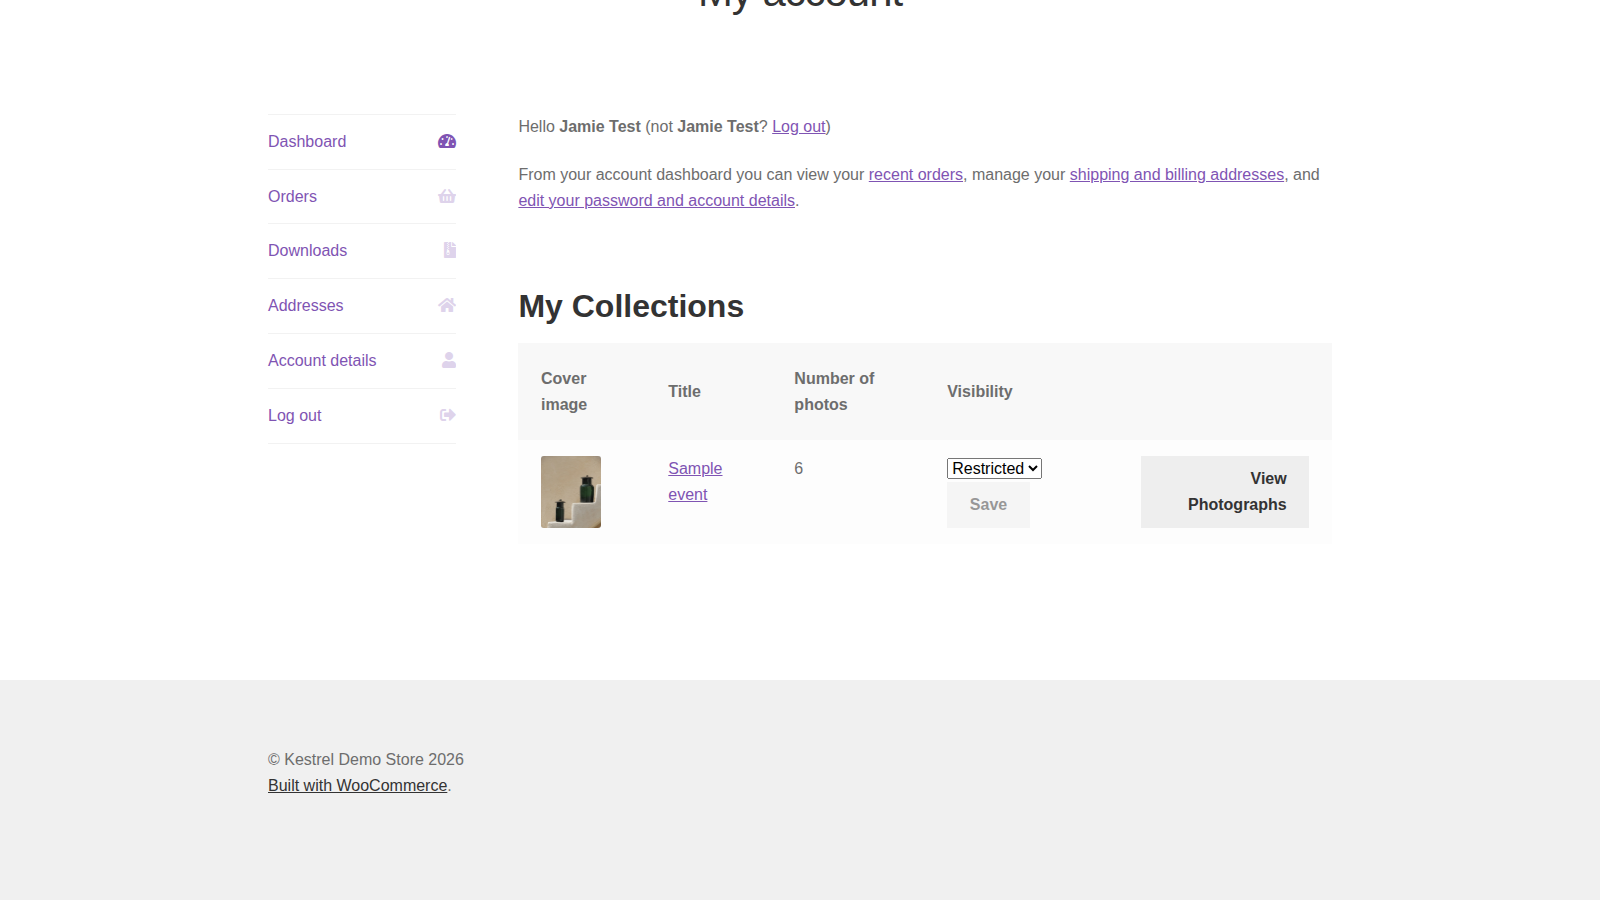
Customers can switch a collection between Restricted and Public there and click Save, for example to share it with family by link. The change applies to the collection itself, so it affects everyone who has access to it, not just that customer.
On the collection page
The collection page shows each photo with its SKU, price, any product add-on options, a quantity field and its caption. Clicking a photo opens the larger image.

Customers set how many prints they want of each photo, or use Select at the top to set the same quantity for every photo, then click Add to cart. Only photos with a quantity above zero are added. If your store sends shoppers to the cart after adding a product, they go to the cart.
On a photo’s own page
Each photo also has a standard product page, with an add to cart button and links to its collections.
The New Photography Collection email
Manage this email under WooCommerce » Settings » Emails » New Photography Collection. It’s on by default, and it’s sent when you add collections to a customer on their user profile. The default subject is "[{site_title}] Your photographs are ready! – {collections}", and the default heading is "Photos from your event(s) have been added to your account & are ready to be viewed."
Sell prints with options
With WooCommerce Product Add-Ons active, you can offer options on every photo in a collection, such as print sizes, a mat board, a frame, or a choice of print lab, each with its own price.
- Go to Products » Add-Ons and create an add-on group, or edit one.
- In Product Categories, pick your collections. They’re listed under Photography Collections as "Collection: " followed by the collection name.
- Add the fields you want, then save the group.
The options appear under each photo on the collection page and on the photo’s own page. For a choice that applies to the whole order rather than each photo, such as a single print lab or delivery method, add a checkout field with a checkout field editor plugin instead.
Deactivate or remove Photography
Your photos are WooCommerce products, and they stay published if you deactivate the plugin. Without it, nothing restricts them: they show in your shop and search results like any other product, and collection pages stop working. Set the photos to draft or private first if you don’t want that.
Deleting the plugin removes its settings and the New Photography Collection email settings. Your photo products, collections and customers’ access stay in your database.
Common issues
Customers are sent to the My account page
The collection is Restricted and the visitor isn’t logged in as a customer with access. Ask them to log in, add the collection to their profile, or make the collection Public.
A customer doesn’t see My Collections
My Collections only lists collections added to the customer’s profile, on the My account dashboard. Edit the user and check the Collections field.
The customer didn’t get the email
The email is only sent when a collection is newly added on the customer’s user profile. Check that New Photography Collection is enabled under WooCommerce » Settings » Emails, and check your store’s email delivery.
Photos don’t appear in the shop
Turn on Shop Page Visbility under Photography » Settings, and set the collection’s Visibility to Public. Both are needed.
"You don’t have permission to purchase this photo!"
The customer tried to add a photo from a restricted collection they don’t have access to. Add the collection to their profile, or make it public.
"Please choose the quantity of items you wish to add to your order…"
The customer clicked Add to cart on a collection page without setting a quantity above zero for any photo.
"Sorry, you are not allowed to manage options for this site."
Your account isn’t an administrator. Shop managers can see the Photography settings but can’t save them. Ask an administrator to change them.
Uploads fail or stop partway
The image is larger than the maximum upload file size shown on Add Photographs, or isn’t a JPEG, GIF or PNG file. Photos that finished uploading are already published; check the review list or Products. Ask your host to raise the upload and memory limits for large files.
Photo SKUs don’t follow on from the last batch
Each new SKU is numbered from the most recent SKU containing your pattern anywhere in it. Use a pattern no other product’s SKU contains, and check the SKUs in the review list before you save.
Thumbnails didn’t change after I changed the sizes
New sizes only apply to new uploads. Regenerate thumbnails for the photos you’ve already uploaded.
Keep learning
- How to install and update WooCommerce extensions (installing, updating and fixing upload errors)
- Changing text in a plugin (renaming labels such as "My Collections" without code)
- How to add custom CSS to your site (styling the collection page)